Many Peloton bike owners notice that the handlebar adjustment is not just about comfort—it’s the secret to better workouts, fewer injuries, and a more enjoyable ride. Whether you’re new to indoor cycling or a seasoned rider, setting your handlebars correctly can transform your Peloton experience.
But what does “correct” really mean? Adjusting handlebars is not one-size-fits-all. Your height, riding style, and personal preferences play a big role. This article will guide you through every detail of Peloton bike handlebar adjustment, from basic mechanics to advanced tips.
You’ll learn how to find the right position, avoid common mistakes, and get more out of every session. By the end, you’ll feel confident making changes that suit your body and goals.
Why Handlebar Adjustment Matters
You might think handlebar height is a minor detail. It’s not. A poorly adjusted handlebar can cause back pain, neck strain, and even limit your power output. According to a study by the American College of Sports Medicine, improper bike setup is a leading cause of discomfort for indoor cyclists. The right handlebar position helps you:
- Maintain proper posture
- Reduce pressure on your wrists and shoulders
- Improve your breathing and endurance
- Increase power, especially during climbs
Peloton bikes are designed to fit many body types, but small tweaks make a big difference. For example, a tall rider might need the handlebars higher than a shorter person, but riding style matters too. If you like intense sprints, a lower handlebar can give you more leverage.
If you prefer longer rides, a higher handlebar may help reduce fatigue.
Anatomy Of Peloton Bike Handlebar Adjustment
Let’s break down the key parts involved in adjusting the Peloton bike handlebars. Understanding these will make the process easier and safer.
Handlebar Height
The most important adjustment. Peloton bikes have a vertical post that lets you raise or lower the handlebars. The correct height depends on your torso length and riding goals.
Handlebar Fore-aft (distance)
Some Peloton models—like the Bike+—allow you to slide the handlebars closer or further from the saddle. This changes your reach and affects your back and shoulder comfort.
Handlebar Angle
Not all Peloton bikes allow angle adjustment. On basic models, the handlebars are fixed, but some upgrades and third-party kits offer angle customization. Changing the angle can relieve wrist strain.
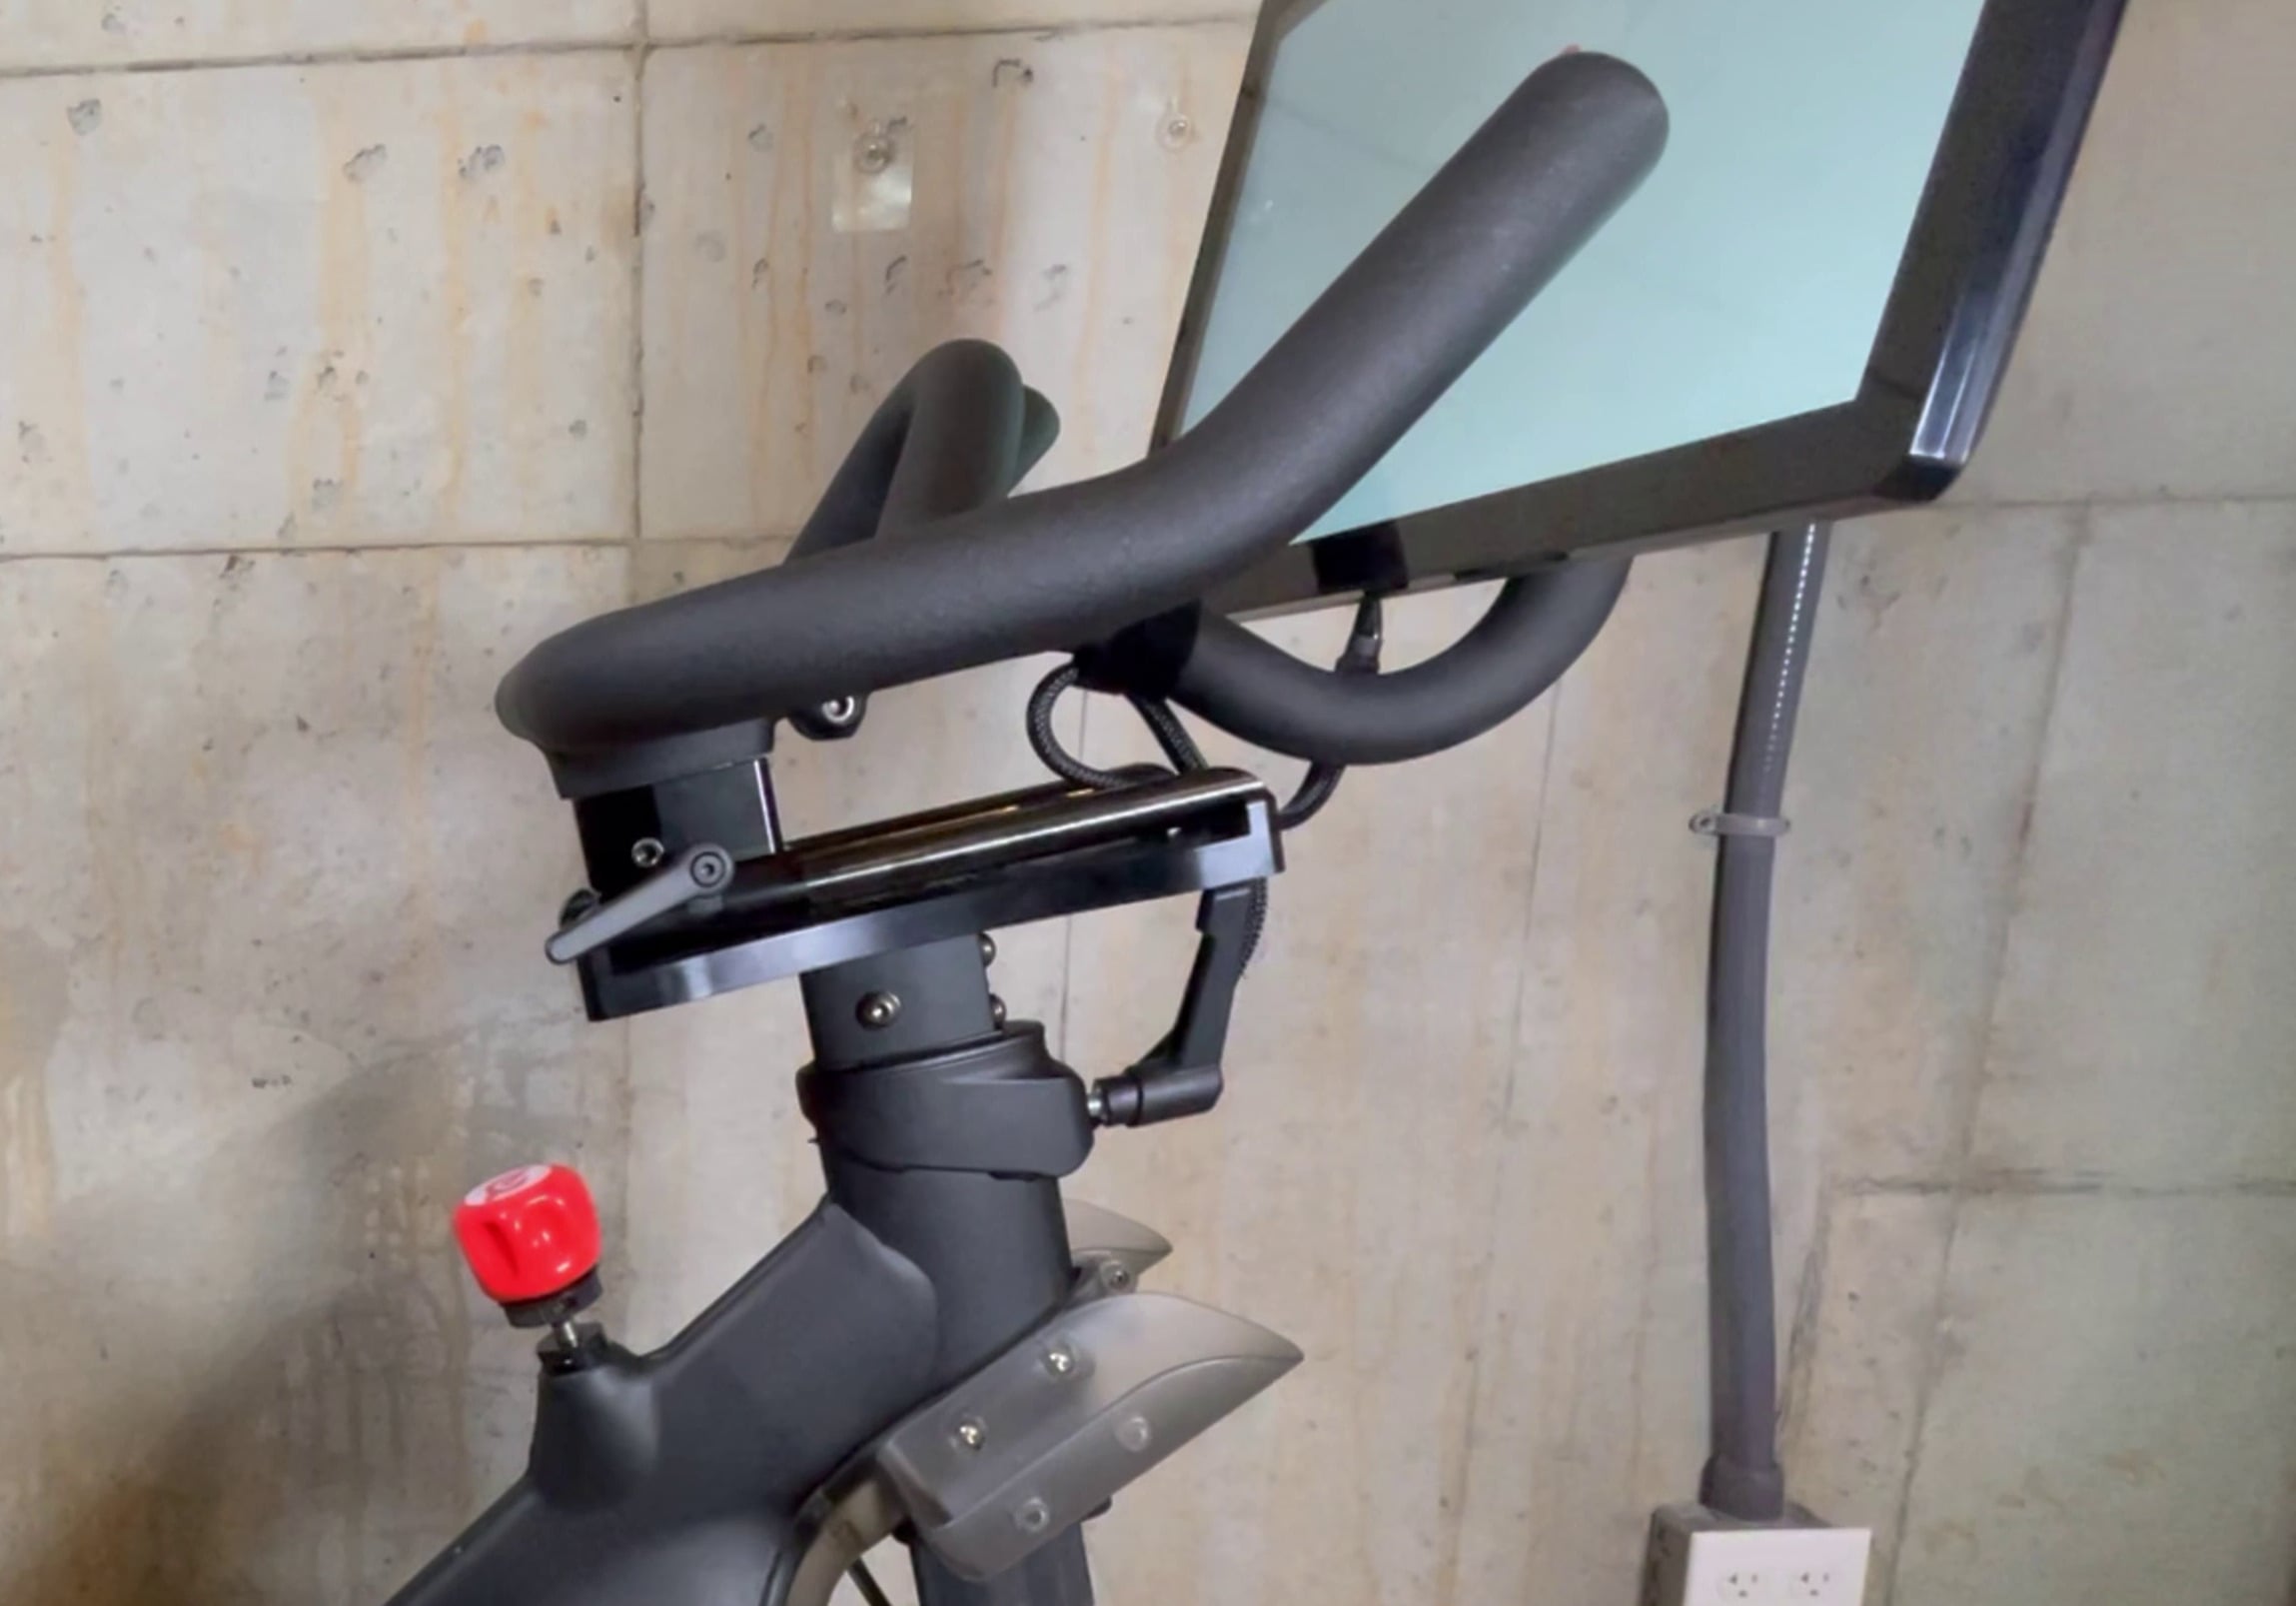
Quick-release Lever
The lever is what locks your handlebars in place. Always check that it’s tight after any adjustment. A loose lever can cause wobbling or, worse, injury.
Compatibility
Older Peloton bikes may have fewer adjustment points than newer models. If your bike doesn’t have fore-aft adjustment, you can buy aftermarket kits—but always check compatibility.

Step-by-step: Adjusting Peloton Bike Handlebars
Getting your handlebars right is a process. Here’s a practical, step-by-step guide:
- Stand next to the bike. The handlebars should be roughly level with your saddle for most riders. If you have back pain, start with the handlebars higher.
- Loosen the quick-release lever on the handlebar post.
- Raise or lower the handlebars to your desired height.
- Tighten the lever securely. Test by gently shaking the handlebars.
- If your model allows, slide the handlebars forward or backward to adjust reach.
- Check your riding position by sitting on the bike. Your elbows should be slightly bent, and you shouldn’t feel stretched or cramped.
- If you have angle adjustment, tilt the handlebars to reduce wrist pressure.
- Ride for 5–10 minutes and notice any discomfort. Adjust as needed.
Example Scenario
A rider who is 5’8″ (173 cm) often finds the default handlebar height too low. Raising the handlebars by 2–3 inches reduces shoulder pain and allows better breathing. If you’re taller, you may need to raise them even more.
Common Mistakes
- Setting handlebars too low, causing hunched posture
- Not tightening the lever fully
- Forgetting to check fore-aft adjustment (if available)
- Ignoring discomfort and sticking with default settings
Finding Your Ideal Handlebar Position
There’s no universal “perfect” handlebar height. The ideal position depends on your body and workout goals. Here’s how to find yours:
Consider Your Height
Shorter riders usually prefer handlebars closer to saddle height. Taller riders often need them higher.
Torso Length Matters
If you have a longer torso, you may need the handlebars further away to avoid cramped arms. A short torso usually means closer handlebars.
Flexibility And Injury History
If you have limited flexibility or a history of back pain, start with the handlebars higher. This reduces strain.
Riding Style
- Power riders (who like sprints) often use lower handlebars for more leverage.
- Endurance riders (long, steady rides) usually prefer higher handlebars for comfort.
Practical Test
Sit on the bike, reach for the handlebars, and check:
- Are your shoulders relaxed?
- Is your back straight, not hunched?
- Do your wrists feel neutral (not bent upward or downward)?
- Can you pedal without feeling stretched?
If you answer “no” to any, adjust the handlebars.
Comparing Peloton Handlebar Adjustments To Other Bikes
Peloton bikes aren’t the only indoor cycles out there. How does their adjustment system compare to others? Here’s a quick comparison:
| Bike Brand | Height Adjustment | Fore-Aft Adjustment | Angle Adjustment |
|---|---|---|---|
| Peloton Bike | Yes | Bike+ only | Limited (aftermarket kits) |
| Schwinn IC4 | Yes | Yes | Yes |
| Echelon EX-5 | Yes | Yes | No |
| NordicTrack S22i | Yes | Yes | No |
Peloton’s handlebar adjustment is simple but less flexible than some competitors. If you want more customization, consider aftermarket kits or look for bikes with more adjustment points.
Advanced Handlebar Adjustment Tips
Once you master the basics, you can fine-tune your setup for even better performance.
Use A Tape Measure
Measure the distance from your saddle to the handlebars. Most riders find comfort between 45–55 cm. Experiment to find your sweet spot.
Mark Your Setting
If multiple people use the same bike, mark your preferred handlebar height and fore-aft position with tape. This saves time and reduces confusion.
Upgrade Your Handlebar
Some third-party companies offer replacement handlebars with more adjustment options. Check compatibility before buying.
Try Ergonomic Grips
If you experience wrist pain, ergonomic handlebar grips can help. They change the angle and reduce pressure points.
Adjust For Different Workouts
For HIIT rides, lower handlebars offer more power. For recovery rides, raise them for comfort.
Data-driven Adjustment
According to a survey from Peloton’s own forums, riders who adjusted their handlebars at least once a month reported 15% fewer injuries than those who never changed settings.
Handlebar Adjustment For Different Body Types
Not everyone has the same body shape. Here’s how to adjust for different needs:
| Body Type | Recommended Adjustment | Reason |
|---|---|---|
| Tall (over 6’0”) | Raise handlebars above saddle | Reduces back and neck strain |
| Short (under 5’5”) | Keep handlebars level with saddle | Maintains reach and posture |
| Long arms/torso | Slide handlebars forward (if possible) | Prevents cramped shoulders |
| Limited flexibility | Raise handlebars higher | Reduces pressure on lower back |
If you don’t fit these categories, start with the basic settings and adjust by feel.
Troubleshooting Handlebar Adjustment Problems
Sometimes things don’t go smoothly. Here’s how to fix common issues.
Handlebar Won’t Move
- Make sure the quick-release lever is fully loosened.
- Check for dirt or debris in the adjustment slot.
- If stuck, apply a small amount of bike-safe lubricant.
Handlebar Slips During Ride
- Tighten the lever more firmly.
- Inspect for worn parts—replace if needed.
- Avoid hanging towels or heavy items on the handlebars.
Handlebar Feels Wobbly
- Check all bolts for tightness.
- If wobbling continues, contact Peloton support.
Can’t Find Comfortable Position
- Try small changes—move handlebars in 1 cm increments.
- Ask a friend to check your posture.
- Consider professional bike fitting if discomfort persists.
Real-life Examples And Stories
A Peloton rider named Alex started with the default settings. After two weeks, he noticed wrist pain. By raising the handlebars 2 inches and switching to ergonomic grips, he eliminated the pain. Another rider, Mia, had chronic back issues. She raised her handlebars above saddle height and started using a fore-aft kit.
Her discomfort vanished, and her performance improved.
These changes aren’t just about comfort—they can boost your motivation. When your bike feels right, you’re more likely to ride longer and stick with your fitness goals.
How Often Should You Adjust Your Peloton Handlebar?
Most riders set their handlebars once and forget them. But your body changes over time. Experts suggest reviewing your setup every 3–6 months or after any injury. If you share the bike, check before every ride.
- After injury: Adjust handlebars higher for less strain.
- After weight loss/gain: Recheck posture and reach.
- When changing workout style: Lower for sprints, higher for endurance.
Peloton Handlebar Adjustment And Injury Prevention
A well-adjusted handlebar is your first defense against injury. According to the International Journal of Sports Medicine, over 30% of indoor cyclists report wrist or back pain linked to poor setup. Proper adjustment helps:
- Keep your back straight
- Reduce wrist bending
- Prevent numbness in hands and fingers
- Lower risk of overuse injuries
If you feel pain during or after rides, check your handlebar position before anything else.
Upgrading Peloton Handlebar Adjustment (accessories & Kits)
If you want more flexibility, consider handlebar accessories. Here are some popular options:
Fore-aft Adjustment Kits
These kits let you slide handlebars forward or back. They’re especially useful for tall riders or those with long arms. Prices range from $50–$120.
Ergonomic Handlebar Grips
Grips with special shapes reduce wrist strain. Many cost under $30 and are easy to install.
Adjustable Handlebar Stems
Some third-party companies sell stems that allow angle adjustment. Always check reviews and compatibility.
Replacement Handlebars
You can buy new handlebars with more adjustment points. Make sure to use trusted brands.
Comparison Table: Common Accessories
| Accessory Type | Average Price | Installation Difficulty | Benefit |
|---|---|---|---|
| Fore-Aft Kit | $75 | Medium | Custom reach |
| Ergo Grips | $25 | Easy | Reduces wrist pain |
| Adjustable Stem | $90 | Medium | Angle control |
| Replacement Bar | $120 | Hard | Full customization |
When To Seek Professional Help
If you can’t find a comfortable position, or if you have ongoing pain, consider professional bike fitting. Many cycling shops offer this service. They measure your body and set the bike for you. The cost ranges from $50–$200 but can prevent months of discomfort.
Safety And Maintenance Tips
Adjusting your handlebars is only safe if you follow a few rules:
- Always check that the quick-release lever is tight before riding.
- Inspect handlebars for cracks or wear every month.
- Clean adjustment slots regularly to prevent sticking.
- Never force the handlebars if stuck—this can damage the bike.
If you upgrade parts, use official accessories or trusted brands. Poor-quality kits can cause safety issues.
Peloton Bike+ Vs Original Peloton: Handlebar Adjustment Differences
The newer Peloton Bike+ offers more adjustment options, especially for fore-aft movement. This makes it easier to find a comfortable position. The original Peloton bike has only height adjustment.
- Bike+: Both height and fore-aft adjustment, easier for tall riders.
- Original: Height only, may require aftermarket kits.
If you’re shopping for a Peloton, consider these differences. If you already own the original, aftermarket kits can help.
Tips For Sharing A Peloton Bike
If your household shares one bike, handlebar settings can cause conflicts. Here’s how to manage:
- Use colored tape or stickers to mark each person’s settings.
- Teach everyone how to adjust quickly.
- Store a list of preferred settings for each rider.
- Adjust before every session, not after.
This keeps everyone comfortable and safe.
Non-obvious Insights Most Riders Miss
- Handlebar height affects your breathing: If handlebars are too low, your chest compresses. Higher handlebars open your chest, making it easier to breathe deeply.
- Small changes matter: Adjusting handlebars by just 1 cm can make a big difference. Don’t wait for major discomfort to change settings.
- Check handlebar angle after upgrades: If you install new grips or bars, recheck the angle. Even tiny shifts can affect wrist comfort.
Expert Recommendations
Professional trainers recommend starting with handlebars level with the saddle, then adjusting based on comfort. Don’t copy someone else’s setup—your body is unique. If you feel pressure in your wrists or back, try raising the handlebars.
If you’re serious about performance, measure your saddle-to-handlebar distance and record it. This helps track changes and spot trends.
For more on indoor cycling safety and setup, see Bicycling Magazine.
Frequently Asked Questions
How High Should My Peloton Handlebars Be?
The handlebars should be roughly level with your saddle. If you have back or neck pain, raise them higher. The right height depends on your body and riding style.
Can I Adjust Peloton Handlebars Forward And Backward?
On the Peloton Bike+, yes. The original Peloton bike does not offer fore-aft adjustment unless you use an aftermarket kit.
What If My Handlebars Keep Slipping?
Check that the quick-release lever is tight. If slipping continues, inspect for worn parts or debris. Replace worn parts as needed.
Is Professional Bike Fitting Necessary?
Not always. Many riders find comfort with basic adjustments. If you have ongoing pain, professional fitting can help.
How Often Should I Check My Handlebar Position?
Review your setup every 3–6 months or after injury, weight change, or new workout routines. If multiple people use the bike, check before each ride.
Getting your Peloton handlebar adjustment right is more than a technical detail—it’s the foundation of a safe, enjoyable ride. Comfort, performance, and injury prevention all depend on your setup. By following these steps and tips, you can customize your bike to fit your body and goals.
Don’t be afraid to experiment or seek help if needed. Small changes can lead to big improvements, and your Peloton sessions will feel better than ever.
