The Keiser M3i has changed how people think about indoor cycling. This stationary bike is a favorite in gyms, cycling studios, and homes. But one part often confuses new users: the resistance levels. What do the numbers mean? How do you know which level to use? And how does the resistance system compare to other indoor bikes?
If you want to get the most from your Keiser M3i, understanding resistance is key. This guide breaks down every detail, from how the system works to how to choose the right setting for your goals. Whether you’re a beginner or a seasoned rider, you’ll find practical advice, real examples, and insights you won’t hear in a quick sales pitch.
What Makes The Keiser M3i Resistance System Unique?
Most indoor bikes use either a friction pad or a basic magnetic system to create resistance. The Keiser M3i stands out because it uses a magnetic resistance system that offers 24 smooth, consistent levels. This means you don’t feel sudden jumps or drops as you turn the resistance lever. The movement is fluid, and you always know exactly how much effort you’re putting in.
Unlike friction-based bikes, there’s no contact between moving parts, so the system is nearly silent. The lack of wear and tear means less maintenance and a longer lifespan. For users, this is a big deal: you can train early in the morning or late at night without disturbing others.
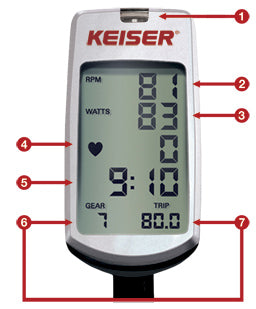
The resistance levels are also digitally displayed. You see a clear number (1–24) on the bike’s console. This makes it easy to track your progress, repeat workouts, or follow online classes where instructors call out specific resistance settings.
Understanding The 24 Resistance Levels
The Keiser M3i has 24 resistance levels, each represented by a number. But what does each level actually feel like? Here’s a breakdown:
- Levels 1–4: Very light. Feels like riding on a smooth, flat road.
- Levels 5–9: Light to moderate. Similar to a gentle slope or headwind.
- Levels 10–14: Moderate. Feels like a steady uphill climb.
- Levels 15–19: Challenging. Like a steep hill or pushing a heavy gear.
- Levels 20–24: Very hard. For advanced sprints, climbs, or power intervals.
These levels allow for precise control. You can adjust by a single level to fine-tune your workout, which is especially helpful if you’re following a structured training plan.
How Resistance Feels At Each Level
Resistance isn’t just a number. It changes how your legs, heart, and lungs work. At low levels, you can spin quickly and focus on endurance or recovery. At high levels, your muscles have to push harder, and your heart rate climbs fast.
Let’s look at a practical example:
- Level 3: You can easily maintain 90–100 RPM (revolutions per minute). Great for warming up.
- Level 12: You’ll feel your quads working. Most people ride at 70–85 RPM.
- Level 20: It’s tough to keep 60–70 RPM for long. This is for short, hard pushes or advanced strength work.
Knowing how these numbers feel helps you match the resistance to your goals.
How The Magnetic Resistance Works
The Keiser M3i uses magnetic resistance. Inside the flywheel, magnets move closer or farther from the metal disc as you adjust the lever. The closer the magnets, the higher the resistance. Because there’s no physical contact, there’s no friction, and the system stays quiet and smooth.
This is different from friction bikes, where a pad presses against the flywheel. Friction systems can be noisy and wear out over time. Magnetic resistance, as used in the M3i, is more reliable and needs almost no maintenance.
Key Advantages
- Consistency: Every time you set level 12, you get the same resistance.
- Low maintenance: No pads to replace, no dust from friction.
- Quiet operation: You can ride without disturbing others.
Comparing Keiser M3i Resistance To Other Indoor Bikes
Many people wonder how the Keiser M3i stacks up against other popular bikes. Here’s a comparison to help you understand the differences:
| Bike Model | Resistance Type | Number of Levels | Noise Level | Maintenance |
|---|---|---|---|---|
| Keiser M3i | Magnetic | 24 | Very Low | Minimal |
| Peloton Bike | Magnetic | 100 | Low | Minimal |
| Schwinn IC4 | Magnetic | 100 | Low | Minimal |
| Sunny SF-B1002 | Friction | Continuous | Moderate | High |
Insight: The Keiser M3i uses fewer resistance levels than the Peloton or Schwinn IC4, but each step is larger and very noticeable. This makes it easy to feel the difference as you change levels, which some riders prefer for interval training.
Converting Between Keiser And Other Resistance Scales
If you follow an online class made for another bike, you might need to convert resistance levels. For example, Peloton has 100 levels, while Keiser has 24.
Here’s a simple way to convert:
| Peloton Level | Approx. Keiser M3i Level |
|---|---|
| 10 | 2–3 |
| 25 | 6 |
| 50 | 12 |
| 75 | 18 |
| 100 | 24 |
This isn’t perfect, but it helps you follow different class formats.
How To Choose The Right Resistance Level
Finding the right resistance is more art than science. It depends on your fitness level, your goals, and the type of ride you’re doing.
If You’re New To Indoor Cycling
Start with levels 1–6. Focus on learning good form and finding a comfortable cadence (usually 80–100 RPM). Don’t worry about pushing hard at first. The goal is to build confidence and avoid injury.
For Endurance And Fat Loss
Most rides should happen at levels 7–12. This feels steady but not exhausting. You can talk in short sentences but still feel challenged. Try intervals: 2 minutes at level 10, 1 minute at level 7, repeat for 20–30 minutes.
For Strength And Power
Go higher—levels 14–20. These settings are for climbs, sprints, or short, intense intervals. You’ll ride at a lower cadence (60–80 RPM) and feel the burn in your legs. Use these levels for short bursts, not the whole workout.
For Advanced Training
Test yourself at levels 21–24. These are for experienced riders who want to simulate very steep hills or max effort sprints. Use with caution—these settings are tough and can cause strain if you’re not careful.
Tip: Listen to your body. If your form breaks down or your knees hurt, lower the resistance. Pushing too hard can lead to injury.
How Instructors Use Resistance Levels In Classes
One benefit of the Keiser M3i is how instructors use the resistance scale. In live or recorded classes, you’ll often hear:
- “Ride at level 8 for a warm-up.”
- “Climb at level 16 for 60 seconds.”
- “Sprint at level 20 for 15 seconds.”
This makes it easy to follow along, even if you’re new. You don’t have to guess how hard to push—the numbers guide you.
Non-obvious insight: Many instructors suggest a range (e.g., “level 10–12”) because everyone’s strength is different. Don’t feel bad if you need to choose the lower number. Progress comes from consistency, not pushing to the max every time.
The Role Of Cadence And Resistance Together
Cadence is your pedaling speed, measured in RPM. For each resistance level, you can ride at a different cadence. The right combination creates the best workout.
- Low resistance + high cadence (e.g., level 4 at 100 RPM): Builds cardiovascular fitness and endurance.
- High resistance + low cadence (e.g., level 18 at 60 RPM): Builds strength and muscular endurance.
Mixing both styles in one workout gives the best results. For example, you might do:
- 5 minutes at level 6, 90 RPM (warm-up)
- 2 minutes at level 12, 80 RPM (steady climb)
- 1 minute at level 18, 65 RPM (power push)
- Repeat for 30 minutes
Practical tip: Don’t just crank up the resistance and pedal slowly. If you can’t keep at least 60 RPM, the resistance is probably too high for safe training.
Tracking Progress With Resistance Levels
One of the best ways to see improvement is to repeat the same workout at the same resistance and watch your numbers change. For example:
- Week 1: 10 minutes at level 10, average RPM 80, heart rate 150 bpm
- Week 4: 10 minutes at level 10, average RPM 85, heart rate 140 bpm
This shows your fitness is improving—you’re riding faster at the same resistance with less effort.
You can also use resistance levels to set goals. For example, “I want to climb at level 16 for 5 minutes without stopping. ” As you get stronger, increase either the resistance, the time, or both.
Common Mistakes When Using Keiser M3i Resistance Levels
Many beginners (and some experienced riders) make the same errors. Avoid these for the best results:
- Chasing the highest level: More resistance isn’t always better. Good form and steady cadence matter more.
- Ignoring cadence: Riding at a very low RPM (below 60) just to use a high resistance stresses your knees.
- Not using enough resistance: Too little resistance means you “bounce” in the saddle and don’t get a real workout.
- Keeping the same resistance all ride: Change it up! Use intervals, climbs, and sprints.
- Not tracking progress: Write down your favorite workouts, resistance levels, and results. Small improvements add up.
How Resistance Affects Calories Burned
Many people want to know: “Does higher resistance burn more calories?” The answer is yes—but only if you can keep moving at a good pace. If you set resistance so high you slow down, you might actually burn fewer calories.
A good indoor cycling session on the Keiser M3i burns about 400–700 calories per hour, depending on your weight, resistance level, and intensity. Mixing resistance and cadence (interval style) is usually the most effective for fat loss and fitness.

Real-world Example: A 30-minute Keiser M3i Workout
Here’s a sample ride that uses different resistance levels for a full-body, effective workout:
- Warm-up: 5 minutes at level 4, 90–100 RPM
- Steady climb: 4 minutes at level 10, 80 RPM
- Power interval: 1 minute at level 16, 65 RPM
- Recovery: 2 minutes at level 6, 90 RPM
- Steep climb: 3 minutes at level 14, 70 RPM
- Sprint: 30 seconds at level 20, as fast as you can
- Recovery: 2 minutes at level 5, 90 RPM
- Repeat steps 2–7 once
- Cool down: 5 minutes at level 3, 85 RPM
This ride uses multiple resistance settings and gives both cardio and strength benefits. Adjust the numbers if you’re a beginner—start lower and build up as you improve.
How To Maintain Consistent Resistance Over Time
Because magnetic resistance doesn’t wear down, the Keiser M3i stays consistent year after year. But there are still a few tips to keep things running smoothly:
- Clean the bike regularly: Dust and sweat can affect the electronics.
- Check the calibration: If you feel resistance isn’t matching the display, calibrate using the bike’s instructions.
- Avoid sudden, forceful changes: Move the resistance lever smoothly to protect the mechanism.
Most users find the Keiser M3i needs almost no maintenance beyond basic cleaning—a big advantage over friction-based bikes.
Data Tracking And Bluetooth Connectivity
One of the biggest upgrades on the Keiser M3i is its ability to connect with fitness apps. The bike sends your resistance level, cadence, and power output to apps like Keiser M Series, Zwift, or Peloton Digital (with some adjustments).
This means you can:
- Record your workouts automatically
- Share your data with a coach or friends
- Join virtual rides or races
Non-obvious insight: If you switch apps, check how they interpret resistance. Some apps use “power” (watts) as the main number. This is based on your resistance and cadence together. You can use your resistance level as a guide, but always watch your power and heart rate for the best results.
Advanced Tips For Getting The Most From Keiser M3i Resistance
Here are a few strategies that most riders miss:
- Test your threshold: Once a month, see how long you can hold a high resistance (e.g., level 16) at 80 RPM. This shows your progress better than just time or distance.
- Use resistance “waves”: Instead of steady intervals, slowly increase resistance every minute for 5 minutes, then decrease. This builds endurance and keeps workouts interesting.
- Try “micro intervals”: 30 seconds at level 12, 30 seconds at level 18, repeat. This challenges your body in new ways and is great for breaking plateaus.

The Science Behind Magnetic Resistance
Magnetic resistance is based on Faraday’s Law. As the magnets move closer to the spinning flywheel, they create an eddy current in the metal, which resists the motion. This produces a smooth, progressive resistance—no jerky jumps.
Studies show that magnetic systems give more accurate, repeatable results than friction-based systems. This is important for tracking fitness, competing, or just knowing you’re getting a consistent workout. For more on the technology, see this Stationary Bicycle article on Wikipedia.
Is 24 Levels Enough?
Some riders worry that 24 levels might not be enough, especially compared to bikes with 100 levels. In practice, most people use only 6–10 different settings in a workout. The Keiser’s wider steps mean each level matters more.
If you’re doing group rides, teaching classes, or just want simple choices, 24 is usually perfect. If you want ultra-fine control (for example, if you’re a professional racer), you might prefer a bike with more levels—but for 99% of users, the M3i is ideal.
Frequently Asked Questions
What Is The Highest Resistance Level On The Keiser M3i?
The highest is level 24. This setting gives the most magnetic resistance possible. It’s challenging for even advanced riders and is used mainly for short sprints or very steep climbs.
How Do I Know Which Resistance Level To Use?
Start low and increase slowly. Most beginners find levels 4–10 are comfortable. Adjust based on your workout goals—higher for strength, lower for endurance. Listen to your body and maintain good form.
Can I Follow Peloton Or Zwift Classes With The Keiser M3i?
Yes, but you’ll need to convert resistance levels. For example, level 12 on Keiser is close to level 50 on Peloton. Many apps let you customize your display to match the Keiser scale.
Does The Resistance Ever Need To Be Recalibrated?
Rarely. The magnetic system is very stable. If the resistance feels off compared to the display, check your bike’s calibration following the manual. Most users never need to recalibrate.
Is Higher Resistance Always Better For Building Muscle?
Not always. Higher resistance builds strength, but form and cadence matter more. Mix up your training—combine high resistance for short intervals with lower resistance for endurance.
—
The Keiser M3i’s 24 resistance levels provide a simple, effective way to control your indoor cycling experience. Whether you want to build endurance, burn fat, or boost your power, understanding how to use the resistance system is key. With its smooth magnetic system, easy-to-read display, and reliable performance, the Keiser M3i is a top choice for riders of all levels. The real secret is finding the right combination of resistance and cadence for your goals—and enjoying the journey as you get stronger, faster, and fitter.
