Setting up your Peloton Bike is more than just turning it on. A good setup makes your rides safer, more comfortable, and helps you get the best results from every workout. If you’re new to Peloton or cycling, the process can feel confusing.
But you don’t need to worry. This guide walks you through each step, from getting the bike out of the box to making sure your first ride feels great. You’ll learn how to adjust your bike for your body, connect to Wi-Fi, set up the screen, and even avoid common mistakes that many beginners make.
By the end, you’ll know exactly how to create a space where you can enjoy every ride and get the most from your Peloton experience.
Unboxing And Preparing Your Peloton Bike
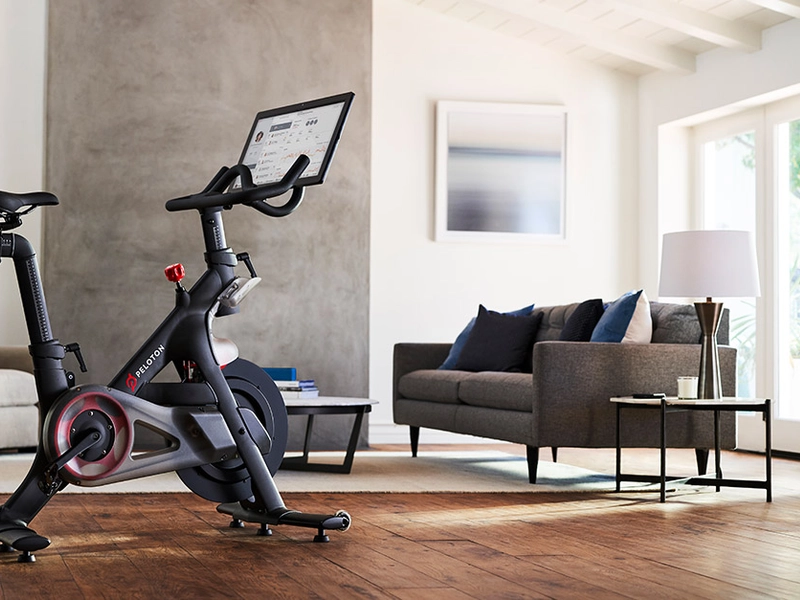
When your Peloton Bike arrives, it’s exciting—but also a bit overwhelming. The box is big and heavy, so plan ahead. You may need help from another person to move the box and get started. Most people place their bike in a living room, bedroom, or dedicated workout space.
Make sure you have at least 24 inches of clearance around the bike for safe use.
Inside the box, you’ll find:
- The Peloton Bike frame
- The screen (touch display)
- Pedals
- Seat and handlebars
- Tools (Allen wrench, screwdriver)
- Power cable and adapter
- User manual
- Small accessories (water bottle holder, sometimes a mat)
Check that you have all these parts. If anything is missing or damaged, contact Peloton support before assembling.
Choosing The Right Location
Your bike’s location matters. You need:
- A flat, hard surface (carpet can work, but a hard floor is better)
- Enough space for movement and stretching
- Access to a power outlet
- Good lighting for safety and video calls
Avoid placing your bike near windows with direct sunlight, which can heat the screen and cause glare.
Floor Protection And Noise Control
Peloton recommends using a bike mat under your bike. This protects the floor from sweat and scratches and reduces vibration noise. If you live in an apartment, a mat helps keep noise down for neighbors below you.
Assembling Your Peloton Bike
Peloton bikes are designed for easy assembly, but the process takes about 30–60 minutes. If you’re not comfortable with tools, Peloton offers delivery and setup in many areas.
Step-by-step Assembly
1. Attach The Front And Rear Stabilizers
These bars keep your bike steady. Use the provided bolts and tighten with the wrench.
2. Install The Seat And Handlebars
Slide the seat post into the frame and secure it. Do the same with the handlebars.
3. Add The Pedals
Each pedal is labeled “L” (left) and “R” (right). Attach them carefully; the left pedal turns counterclockwise, the right pedal clockwise.
4. Mount The Screen
Carefully slide the screen onto the mount. Connect the cable at the back.
5. Connect The Power Adapter
Plug the adapter into the bike and then into a wall outlet.
6. Install Accessories
Attach the water bottle holder, weights rack, and any other extras.
Safety Check
Before you ride, check:
- All bolts are tight
- Pedals spin smoothly
- Screen is secure
- Nothing is blocking the flywheel
Assembly Data Table
Here’s how Peloton assembly compares with other home bikes:
| Bike Model | Assembly Time (minutes) | Tools Needed | Professional Setup Option |
|---|---|---|---|
| Peloton Bike | 30–60 | Included (wrench, screwdriver) | Yes |
| NordicTrack S22i | 45–90 | Included (wrench, Allen keys) | Yes |
| Schwinn IC4 | 20–45 | Included (wrench, screwdriver) | No |
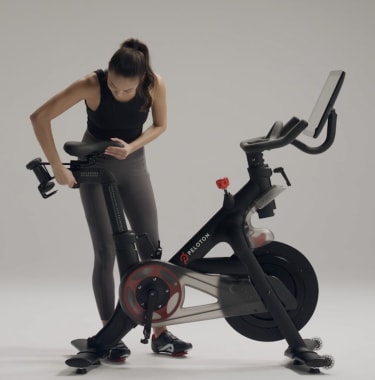
Adjusting The Peloton Bike For Your Body
A proper bike fit is key for comfort and injury prevention. Many people skip this step, but even small adjustments can make a big difference.
Setting Seat Height
Stand next to the bike and align the seat with your hip bone. That’s a good starting height. When you sit, your knee should have a slight bend at the bottom of the pedal stroke—not fully straight, not too bent.
To adjust:
- Loosen the seat post knob
- Move the seat up or down
- Tighten the knob
Adjusting Seat Depth (fore/aft)
The seat should be positioned so your knee is directly over the ball of your foot when the pedal is at 3 o’clock. Move the seat forward or backward, then lock it in place.
Handlebar Height And Reach
Handlebars are usually set level with the seat, but some riders prefer higher handlebars for comfort. If you’re new or have back issues, start with them higher. The reach (distance from seat to handlebars) should let you ride with relaxed shoulders.
Comparison Table: Bike Fit Settings
| Adjustment | Peloton Range | Typical Home Bike Range | Recommended Start |
|---|---|---|---|
| Seat Height | 0–27 inches | 0–25 inches | Hip Bone Level |
| Seat Depth | 0–9 inches | 0–7 inches | Knee Over Pedal |
| Handlebar Height | 0–15 inches | 0–13 inches | Level with Seat |
Fine-tuning
After a few rides, you may notice discomfort in your knees, hips, or hands. Adjust the settings in small increments (half an inch) until you feel comfortable. Don’t rush this—take time to find your ideal fit.
Setting Up The Pedals And Shoes
Peloton bikes use Look Delta cleats, which are different from regular gym bike pedals. You need special cycling shoes that fit these cleats.
Installing Cleats
Attach the cleats to the bottom of your shoes with the screws provided. Make sure they’re tight and positioned straight. If they’re crooked, your feet may hurt during rides.
Clipping In And Out
To clip in, place the front of your shoe into the pedal, then press down firmly. To unclip, twist your heel outward. Practice this before your first ride—it’s not obvious for beginners.
Shoe Fit Tips
Your shoes should be snug but not painful. If your toes are numb after riding, try loosening the straps or adjusting the cleat position.
Common Mistakes
- Not tightening the cleats enough (they can move during rides)
- Wearing regular sneakers (won’t work with Peloton pedals)
- Forgetting to practice clipping out (can lead to falls)

Connecting The Bike To Wi-fi And Power
The Peloton Bike relies on a strong Wi-Fi connection for streaming classes and leaderboards. Slow or unstable Wi-Fi can cause buffering or disconnects.
Wi-fi Setup
- Turn on the screen
- Select your network from the list
- Enter your password
- Check signal strength (bars should be full)
If your Wi-Fi is weak, try moving your router closer or use a Wi-Fi extender. Some riders use wired Ethernet for more reliability.
Power Connection
Plug the bike into a dedicated outlet. Avoid using extension cords if possible. The bike uses about 50 watts during normal operation—less than a small lamp.
Data Table: Wi-fi Requirements
| Bike Model | Minimum Speed (Mbps) | Recommended Speed (Mbps) | Connection Type |
|---|---|---|---|
| Peloton Bike | 10 | 25+ | Wi-Fi / Ethernet |
| Peloton Bike+ | 15 | 30+ | Wi-Fi / Ethernet |
| NordicTrack S22i | 5 | 20+ | Wi-Fi |
Troubleshooting
If you lose connection during a ride:
- Check if other devices are also slow
- Restart your router
- Try reconnecting the bike from the settings menu
Setting Up The Peloton Screen And Account
The Peloton screen is your window into classes, stats, and community features. Setting it up well makes your workouts more enjoyable.
Screen Position And Angle
The screen should be easy to see without straining your neck. Tilt it up or down as needed. Avoid glare from windows or lights.
Creating Your Peloton Account
If you’re new, you’ll need to create an account:
- Enter your email address
- Set a password
- Choose a username (this is your leaderboard name)
- Fill in basic profile info (age, gender, fitness level)
Adding Household Members
Peloton allows multiple profiles on one bike. Each person can track their own stats and achievements.
Connecting Bluetooth Devices
You can connect headphones, heart rate monitors, or speakers:
- Open settings
- Choose “Bluetooth”
- Select your device from the list
Bluetooth heart rate monitors can help you track your intensity during rides.
Common Setup Mistakes
- Forgetting to update software (can cause bugs)
- Not connecting headphones before starting a ride
- Using a weak password (security risk)
Calibrating Resistance And Screen
Proper calibration ensures your resistance matches what the instructor says. If your bike isn’t calibrated, you may feel like the rides are too easy or too hard.
Resistance Calibration
Peloton bikes use a knob to control resistance. To calibrate:
- Turn the knob to the lowest setting
- Open the calibration menu on the screen
- Follow on-screen instructions (move knob to highest setting, then back)
Bike+ models use digital calibration, but standard bikes require manual steps. Calibration should be checked every 6 months or after moving the bike.
Screen Calibration
Sometimes the touch screen can feel laggy or unresponsive. You can recalibrate the screen by:
- Restarting the bike
- Running the screen calibration tool in settings
Non-obvious Insight
Many beginners don’t realize that incorrect calibration affects leaderboard rankings. Your “output” may seem too high or low compared to others. Regular calibration helps ensure fair competition.
Accessories And Upgrades
You can customize your Peloton Bike with accessories to make your rides more enjoyable.
Essential Accessories
- Bike mat: Protects floor, reduces noise
- Fan: Keeps you cool during intense rides
- Heart rate monitor: Tracks your effort
- Bluetooth headphones: For clear audio
Optional Upgrades
- Weights rack: For strength classes
- Clip-on screen shade: Reduces glare
- Bike seat cushion: Adds comfort for long rides
Example: Accessory Benefits
Using a fan can reduce perceived effort by up to 10%, according to exercise studies. A heart rate monitor helps you avoid overtraining and track progress.
Common Mistakes
- Buying cheap, non-Peloton accessories that don’t fit
- Ignoring comfort upgrades (like seat cushions)
- Skipping heart rate monitoring (misses important data)
First Ride: What To Expect
Your first Peloton ride will be exciting, but there are some things to watch out for.
Warm-up And Cool-down
Most classes start with a warm-up. Don’t skip this—it prepares your muscles and reduces injury risk. After the ride, do a cool-down stretch.
Choosing A Beginner Class
Peloton offers “Beginner” and “Intro” classes. These are perfect for your first ride. You’ll learn basic cycling moves, how to use resistance, and how to pace yourself.
Tracking Your Performance
During the ride, you’ll see:
- Cadence (pedal speed)
- Resistance (how hard you pedal)
- Output (power, measured in watts)
- Leaderboard (compares your stats with others)
Output is a combination of cadence and resistance. Don’t worry if your numbers are low at first—they’ll improve with practice.
Example: First Ride Stats
Most beginners average 50–70 cadence, 20–30 resistance, and 50–90 output on their first ride. With regular practice, these numbers rise quickly.
Common Mistakes
- Starting with advanced classes (leads to frustration)
- Ignoring instructor cues (increases injury risk)
- Comparing yourself too much with leaderboard
Maintenance And Cleaning
Keeping your Peloton Bike in good shape is easy but important. Regular maintenance prevents breakdowns and keeps your ride smooth.
Cleaning Tips
- Wipe down the frame and screen after every ride (use a soft cloth)
- Clean the pedals and seat weekly
- Avoid harsh chemicals—use mild soap and water
Lubricating The Pedals
Every 3–6 months, add a small amount of bike lubricant to the pedal threads. This prevents squeaks and keeps them easy to remove.
Checking Bolts And Screws
Every month, check all bolts and screws for tightness. Vibration from rides can loosen them over time.
Example: Maintenance Frequency
Peloton recommends a full maintenance check every 6 months. Most riders do simple cleaning weekly.
Common Mistakes
- Forgetting to clean sweat from the screen (can cause stains)
- Not tightening pedals (risk of injury)
- Ignoring unusual noises (can signal bigger problems)
Troubleshooting Common Issues
Even with a good setup, problems can happen. Here’s how to fix the most common issues.
Screen Not Turning On
- Check power cable connection
- Try a different outlet
- Restart with the power button
If the screen is still dead, contact Peloton support.
Noisy Pedals Or Flywheel
- Check for loose bolts
- Lubricate pedal threads
- Make sure nothing is touching the flywheel
Wi-fi Drops During Class
- Move router closer
- Use a Wi-Fi extender
- Connect via Ethernet if possible
Resistance Feels Wrong
- Calibrate the bike
- Check for software updates
- Adjust the knob and test again
Example: Solving Bluetooth Issues
If headphones or heart rate monitors won’t connect:
- Turn Bluetooth off and on
- Forget the device, then reconnect
- Restart the bike
Non-obvious Insight
Many people don’t realize that dust buildup can block sensors inside the bike. Cleaning regularly prevents sensor problems.
Creating A Comfortable And Motivating Workout Space
Your workout space affects your motivation and performance. A good setup makes you want to ride every day.
Lighting
Use bright, natural light if possible. Avoid harsh overhead lights that cause glare on the screen.
Airflow
A fan or open window helps prevent overheating. Many riders place a small fan behind the bike for best results.
Music And Audio
Good audio improves the class experience. Bluetooth headphones or speakers let you enjoy instructor cues and music without disturbing others.
Decor And Motivation
Add inspiring posters, plants, or a whiteboard for tracking progress. Some riders use LED lights for a fun atmosphere.
Example: Space Setup
A 6 x 6 foot space is ideal for the bike, mat, fan, and stretching area. Keep water and towels within reach.
Common Mistakes
- Placing the bike too close to walls (limits movement)
- Neglecting ventilation (leads to overheating)
- Ignoring audio setup (misses cues)
Tracking Progress And Setting Goals
Peloton offers many tools for tracking progress and setting goals. Using them helps you stay motivated.
Metrics
The bike tracks:
- Total rides
- Calories burned
- Distance
- Output
- Achievements (badges, streaks)
Setting Goals
Start with simple goals:
- Ride 3 times a week
- Improve output by 10% in a month
- Try a new class type each week
Example: Progress Tracking
Peloton shows weekly and monthly summaries. You can view stats in the app or on the screen.
Non-obvious Insight
Many riders don’t realize you can export your ride data for deeper analysis. This helps spot trends and plateaus.
Common Mistakes
- Setting unrealistic goals (leads to disappointment)
- Ignoring rest days (causes burnout)
- Not tracking progress (misses motivation boosts)
Peloton Bike Vs. Other Indoor Bikes
Peloton is popular, but how does it compare to other indoor bikes?
Key Differences
- Interactive classes: Peloton offers live and on-demand classes with leaderboards
- Build quality: Peloton uses sturdy materials and smooth mechanics
- Community: Peloton has a large, active user base
Comparison Table: Peloton Vs. Competitors
| Feature | Peloton Bike | NordicTrack S22i | Schwinn IC4 |
|---|---|---|---|
| Live Classes | Yes | No | No |
| Leaderboard | Yes | No | No |
| Community Size | 3+ million | ~1 million | ~500,000 |
| Screen Size | 21.5″ | 22″ | N/A (uses app) |
| Build Quality | High | High | Medium |
Example: Community Motivation
Peloton’s community helps keep riders motivated. Many users report riding more often because of friendly competition and social features.
External Resource
For more detailed comparisons, visit the official Peloton Wikipedia page.
Frequently Asked Questions
How Often Should I Calibrate My Peloton Bike?
It’s best to calibrate every 6 months or whenever you move the bike. Regular calibration keeps resistance accurate and ensures fair competition on the leaderboard.
Can I Use Regular Gym Shoes With The Peloton Bike?
No, Peloton bikes use Look Delta cleats. You need cycling shoes with these cleats to clip in safely. Regular gym shoes won’t work and can cause slipping.
What Is The Minimum Space Required For A Peloton Bike?
You need at least 6 x 4 feet for the bike and movement. Allow 24 inches on each side for stretching and safety.
Can I Connect My Peloton Bike To A Wired Ethernet Connection?
Yes, both Peloton Bike and Bike+ support Ethernet. Wired connections are more stable and reduce Wi-Fi dropouts during classes.
How Do I Clean The Peloton Screen Safely?
Use a soft, dry cloth or a slightly damp cloth with mild soap. Avoid harsh chemicals or rough towels. Clean after every ride to prevent sweat stains and dust buildup.
Final Thoughts
Setting up your Peloton Bike may seem complicated at first, but with careful attention to each step, you’ll create a space that’s safe, comfortable, and motivating. The right fit, good Wi-Fi, and proper accessories all help you enjoy every ride and make progress toward your fitness goals.
Remember, small adjustments and regular maintenance keep your bike working well for years. With this guide, you’re ready to start your Peloton journey and get the most from every workout.
