Adjusting your Peloton bike seat may seem simple, but getting it right can change your entire riding experience. A properly adjusted seat helps you ride longer, prevents pain, and boosts your performance. Many new Peloton owners rush through setup or stick to factory defaults, missing out on comfort and efficiency.
If you want to make every ride enjoyable and avoid injuries, understanding bike seat adjustment is essential. This guide will help you set up your Peloton bike seat step-by-step, explain why each adjustment matters, and share expert tips that even seasoned riders sometimes overlook.
Why Peloton Bike Seat Adjustment Matters
A Peloton bike is designed to fit many body types, but one size does not fit all. The seat position affects everything—from your posture to your power output. If the seat is too high or too low, you may feel discomfort in your knees, hips, or back. If it’s too far forward or backward, your pedaling can feel awkward, and you might struggle to keep up with instructors.
Studies show that improper bike fit increases risk of overuse injuries, especially in the knees and lower back. According to the American College of Sports Medicine, up to 85% of cyclists experience some form of pain due to poor bike setup. For Peloton riders who log hundreds of hours each year, even small misalignments can cause significant problems.
Proper adjustment also maximizes your workout efficiency. You can generate more power, maintain better balance, and cycle longer without fatigue. In short, adjusting your Peloton seat is the foundation of a safe, effective, and enjoyable ride.
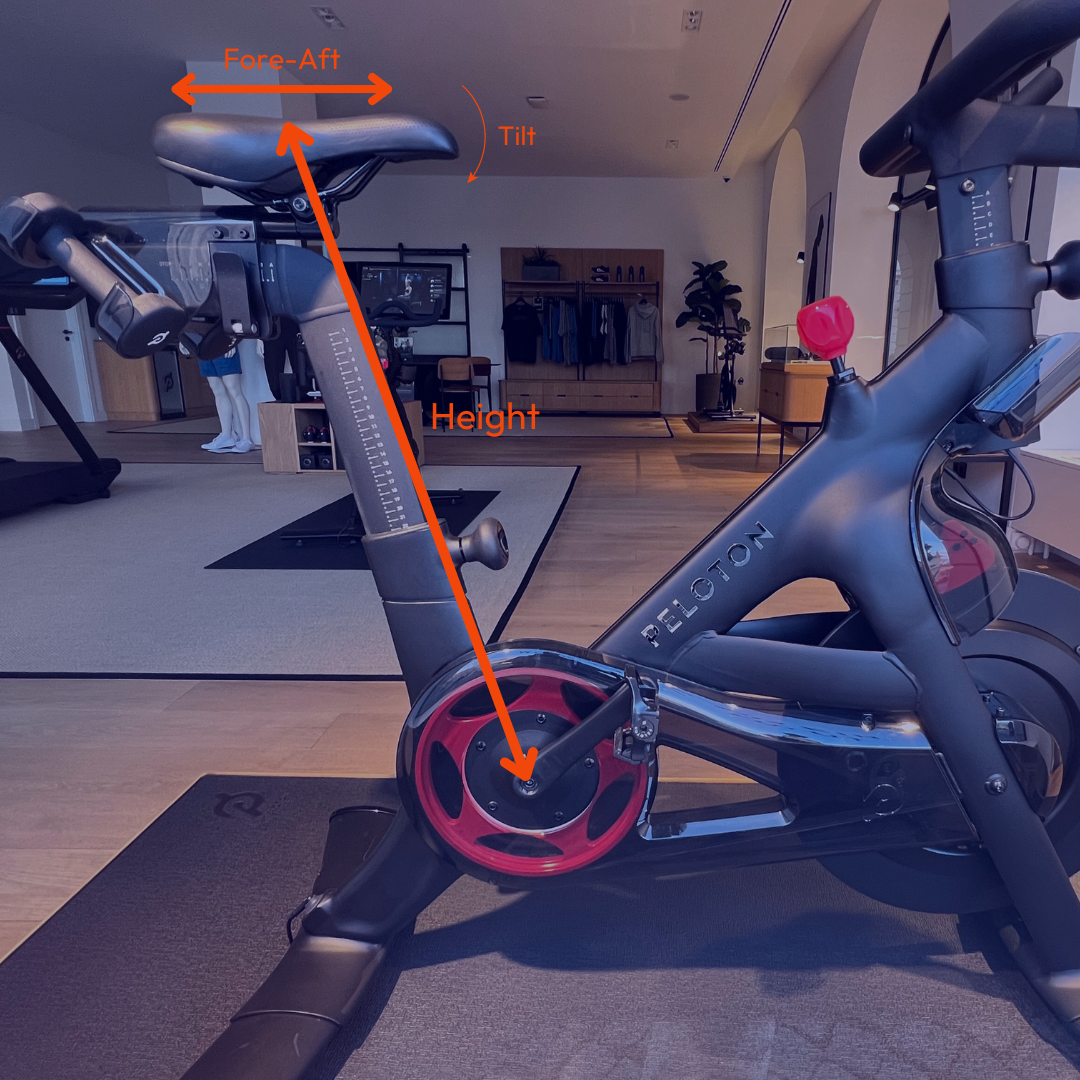
Understanding Peloton Bike Seat Components
Before making any adjustments, it’s important to know the parts involved. The Peloton bike seat system has three main adjustment points:
- Seat height – How high the seat is above the pedals.
- Seat depth (fore-aft) – How far forward or backward the seat is relative to the handlebars.
- Seat tilt – The angle of the seat (flat, nose up, nose down).
Each of these adjustments influences your riding position and comfort. The seat height is controlled by a numbered scale on the seat tube. Seat depth is adjusted using a horizontal slider, and seat tilt can be changed by loosening the seat clamp under the saddle.
| Adjustment | Impact | Common Issues |
|---|---|---|
| Seat Height | Knee angle, leg extension | Knee pain, inefficient pedaling |
| Seat Depth | Hip angle, reach to handlebars | Lower back discomfort, poor balance |
| Seat Tilt | Pressure distribution | Numbness, saddle sores |
Understanding these parts makes it easier to follow the adjustment steps below.
Step-by-step Guide To Adjusting Your Peloton Bike Seat
Setting up your bike seat correctly is not just about following instructions—it’s about tuning for your unique body. Here’s a practical approach to get it right:
Step 1: Adjust Seat Height
Start with the seat height. This is the most important adjustment, as it affects your leg extension and knee angle.
- Stand next to the bike and align the saddle with your hip bone.
- Loosen the seat height knob and move the seat up or down until it matches your hip level.
- Tighten the knob firmly.
Now, sit on the bike and place your feet on the pedals. With the pedal at the lowest point (6 o’clock position), your knee should be slightly bent—about 25–35 degrees. If your leg is fully straight or you have to stretch, the seat is too high. If your knee is sharply bent, the seat is too low.
Expert tip: Use a mirror or ask a friend to check your knee angle. Small errors can cause big discomfort over time.
Step 2: Set Seat Depth (fore-aft)
Next, adjust how far forward or backward the seat sits.
- Loosen the seat depth lever.
- Slide the seat forward or backward. The goal is to position your knee directly above the pedal axle when the pedal is horizontal (3 o’clock position).
- Tighten the lever.
This adjustment is crucial for balance and hip comfort. If the seat is too far back, you may feel stretched; too far forward, and your knees may hurt.
Step 3: Adjust Seat Tilt
Most Peloton seats are set flat by default, but tilt can affect pressure on sensitive areas.
- Use a wrench to loosen the seat clamp under the saddle.
- Tilt the seat slightly up or down—just a few degrees.
- Retighten the clamp.
A flat seat suits most riders, but if you feel pressure or numbness, try a small tilt adjustment.
Step 4: Fine-tune And Test
After making adjustments, ride for 5–10 minutes. Notice how your knees, hips, and back feel. If you feel pain or numbness, make small changes. Often, beginners set the seat too low or too far forward, leading to knee pain after a few rides.
Non-obvious insight: Even experienced riders overlook the importance of frequent re-checks. Your body changes with fitness, so review your setup every few weeks.
Common Mistakes And How To Avoid Them
Even with clear instructions, many Peloton owners fall into simple traps. Here are the most common mistakes—and how to fix them:
- Ignoring seat tilt – Many riders never adjust tilt, leading to numbness or discomfort.
- Setting seat too low – This reduces power and strains your knees.
- Failing to tighten knobs – Loose knobs cause the seat to shift mid-ride, risking injury.
- Not checking seat depth – Riders often focus only on height, forgetting depth affects balance.
- Skipping re-adjustments – As your body adapts, your ideal seat position may shift.
Practical tip: Mark your settings with tape or take a photo. If someone else uses your bike, you can quickly return to your ideal setup.
How Peloton Bike Seat Adjustment Affects Performance
A well-adjusted seat does more than prevent pain—it can improve your workout results. Here’s how:
- Efficient power transfer: With the right seat height and depth, your muscles engage correctly. You push more power into each pedal stroke.
- Better endurance: Less discomfort means longer rides. Studies show riders with proper bike fit cycle up to 30% longer before fatigue.
- Improved balance: Proper seat depth keeps your weight centered, making it easier to stand or sprint.
- Reduced injury risk: Correct knee and hip angles lower the chance of overuse injuries.
Many Peloton users notice immediate gains after adjusting their seat. For example, one survey of indoor cyclists found that riders who fixed their seat height saw a 15% increase in average cadence.
| Seat Adjustment | Performance Impact | Comfort Impact |
|---|---|---|
| Height | Power output, cadence | Knee comfort |
| Depth | Balance, sprinting | Lower back comfort |
| Tilt | Pressure relief | Seat comfort |
Adjusting For Different Body Types
Every rider is unique. The best seat position for you depends on your height, leg length, hip width, and flexibility.
- Tall riders: May need a higher seat and more depth. Check for over-extension.
- Short riders: Lower seat, closer to handlebars. Watch for knee angle.
- Wide hips: Sometimes need a wider saddle or a small tilt adjustment.
- Limited flexibility: A lower seat and more forward depth can help.
Peloton bikes are built to be adjustable, but not every seat fits every body. Some riders benefit from swapping the factory saddle for a wider or more padded option. If you experience ongoing discomfort, consider this change.
Non-obvious insight: Many people don’t realize that their flexibility affects ideal seat position. If you can’t touch your toes, a lower seat might reduce strain.
Peloton Bike Seat Adjustment For Specific Goals
Your seat setup should match your workout goals. Here’s how to adjust for different types of rides:
For Power And Speed
If you focus on high-intensity rides or sprints, set your seat height so your knees are just slightly bent at the bottom of the pedal stroke. Move the seat back a bit for more leverage.
For Endurance And Comfort
For longer, steady rides, prioritize comfort. A slightly lower seat and neutral tilt prevent fatigue. Move the seat forward for easier reach to the handlebars.
For Weight Loss
If your goal is calorie burn, comfort matters. Adjust the seat depth so you can maintain a steady cadence without strain.
For Rehabilitation
If you’re recovering from injury, keep the seat low and tilted slightly up. This reduces pressure on knees and hips.
Practical tip: Don’t be afraid to adjust between rides. Your ideal setup may change based on the day’s workout.
Peloton Bike Seat Adjustment Vs. Other Indoor Bikes
Peloton bikes are similar to other indoor cycling bikes, but their adjustment system is more precise. Many cheaper bikes have fewer adjustment points or less sturdy knobs, making it harder to fine-tune.
Here’s a quick comparison:
| Feature | Peloton Bike | Standard Indoor Bike |
|---|---|---|
| Seat Height Adjustment | Numbered scale, easy knob | Often less precise |
| Seat Depth Adjustment | Horizontal slider | Usually fixed or limited |
| Seat Tilt Adjustment | Clamp under saddle | May not be available |
| Seat Quality | Medium-wide, padded | Varies; often basic |
Peloton’s adjustment system allows for small, precise changes, making it easier to find your perfect fit.
Tips For Maintaining Seat Adjustment
Once you’ve found your ideal settings, keep them secure. Here’s how:
- Check knobs regularly: Tighten seat height and depth knobs every week.
- Inspect for wear: Look for cracks or loose parts under the seat.
- Clean seat post: Dust and sweat can cause slippage. Wipe with a dry cloth.
- Re-check after transport: If you move your bike, settings may shift.
Expert tip: If you ride daily, check your seat position monthly. Small shifts can happen without you noticing.
Signs Your Seat Needs Adjustment
Not sure if your seat is set right? Look for these signs:
- Knee pain: Too low or too far forward.
- Hip discomfort: Seat too high or tilted wrong.
- Numbness or tingling: Seat tilt or saddle shape.
- Lower back pain: Seat depth or height issue.
- Difficulty reaching handlebars: Seat too far back.
If you notice these symptoms, stop and review your setup. Don’t push through pain—adjust until you feel comfortable.

Choosing A Replacement Peloton Bike Seat
Sometimes, the factory seat isn’t right for your body. If you need more comfort, consider replacing the saddle. Here’s what to look for:
- Width: Wider seats support larger hips.
- Padding: Extra padding reduces pressure.
- Shape: Curved or flat, depending on your anatomy.
- Material: Leather, synthetic, or gel covers.
When buying a replacement, check compatibility with Peloton’s seat clamp. Most standard bike saddles fit, but double-check before purchasing.
Common mistake: Buying a seat without checking size or clamp compatibility. Always confirm with the seller or Peloton support.
Peloton Bike Seat Adjustment For Families
If more than one person uses your bike, you’ll need to adjust the seat often. Here’s how to make it easier:
- Record each rider’s settings: Write down height, depth, and tilt numbers.
- Use colored tape: Mark each person’s position on the adjustment scale.
- Store a quick-adjust tool: Keep a wrench or Allen key nearby.
Some families buy a second saddle for quick swaps. If you share the bike, remind all riders to check before each workout.
Troubleshooting Seat Adjustment Issues
Sometimes, adjustments don’t go as planned. Here’s how to solve common problems:
Seat Won’t Move
If the seat is stuck:
- Loosen knobs fully.
- Apply gentle force—don’t hammer.
- Clean seat post with a cloth.
Knobs Won’t Tighten
If knobs slip:
- Check for worn threads.
- Replace knobs if needed.
Seat Tilts Unexpectedly
If the seat tilts mid-ride:
- Tighten clamp under saddle.
- Inspect for damaged bolts.
Squeaking Or Clicking
If you hear noises:
- Lubricate moving parts.
- Check for loose bolts.
If you can’t fix the issue, contact Peloton support for help.
Peloton Bike Seat Adjustment And Injury Prevention
Correct seat adjustment is your best defense against cycling injuries. Most common injuries—like patellar tendonitis, hip strain, and lower back pain—are linked to poor fit.
According to research published in the Journal of Sports Sciences, up to 60% of indoor cyclists report injury symptoms within their first year. Most can be prevented by simple adjustments.
Practical tip: If you feel pain, stop riding and review your setup. Rest, adjust, and consult a professional if pain persists.
Using Technology For Better Adjustment
Some riders use apps or wearable devices to optimize their setup. For example:
- Cycling apps: Track cadence and power, helping you spot inefficiencies.
- Wearable sensors: Measure knee angle and hip movement.
- Smart mirrors: Provide real-time feedback on form.
While these tools are optional, they can help fine-tune your Peloton seat adjustment for maximum comfort and performance.
Peloton Bike Seat Adjustment For Seniors
Older riders may have unique needs. Here’s how to adjust for seniors:
- Lower seat height: Reduces strain on knees.
- Slight seat tilt: Relieves pressure on sensitive areas.
- Extra padding: Adds comfort for longer rides.
Seniors should check seat settings before every ride and avoid aggressive changes. Gentle, gradual adjustments are safest.
Peloton Bike Seat Adjustment For Kids And Teens
If younger family members use the Peloton bike:
- Lower the seat height to match their leg length.
- Adjust depth so they can easily reach the handlebars.
- Use a flat seat tilt to avoid discomfort.
Ensure kids wear proper footwear and supervise adjustments. Never let children ride with adult settings.
How Often Should You Adjust Your Peloton Bike Seat?
There’s no fixed rule, but most riders benefit from checking their seat position monthly. If you notice pain, discomfort, or changes in your fitness, review your setup sooner.
Non-obvious insight: After major weight loss or muscle gain, your body shape changes. Adjust your seat to match.
When To Seek Professional Help
If you struggle to find a comfortable seat position, consider consulting a bike fit specialist. They can measure your body and recommend custom settings.
Professional bike fitting costs around $100–$200, but can prevent injuries and improve your Peloton experience. Many local bike shops offer this service.
Additional Resources
Peloton’s official support site offers videos and guides on seat adjustment. For more detailed information, see Cycling Weekly.

Frequently Asked Questions
How Do I Know If My Peloton Bike Seat Is At The Correct Height?
Your seat is at the correct height if your knee is slightly bent—about 25–35 degrees—when the pedal is at the lowest point. If your leg is fully extended or your knee is sharply bent, adjust the seat until it feels comfortable and natural.
What Should I Do If My Peloton Seat Feels Uncomfortable?
Start by checking seat tilt and padding. Small tilt changes can relieve pressure. If discomfort persists, consider a wider or more padded saddle. Test adjustments for several rides before making big changes.
Can I Use Any Bike Seat On My Peloton?
Most standard bike seats fit Peloton bikes, but check clamp compatibility. Look for seats with similar rail width and shape. If unsure, ask the manufacturer or Peloton support.
How Often Should I Check My Seat Adjustment?
Review your seat position monthly, especially if you ride often or share your bike. After any injury, weight change, or new workout style, check sooner.
Will Changing Seat Position Affect My Performance?
Yes. Proper seat adjustment improves power, balance, and comfort. Riders who adjust their seat regularly report higher cadence, longer rides, and fewer injuries.
Adjusting your Peloton bike seat is more than a one-time task—it’s a key part of enjoying every ride. Whether you’re a beginner or a seasoned cyclist, the right setup makes all the difference. Take the time to find your perfect fit, and remember: comfort and performance start with a well-adjusted seat.
