If you’ve started using a Peloton bike, you’ve probably noticed one thing: your regular sneakers don’t work. Peloton bikes use a special system called “clip-in pedals.” To ride safely and get the most from your workout, you need to use bike cleats. But the world of Peloton bike cleats can feel confusing. This guide will help you understand everything you need to know—from buying the right cleats, to installing and adjusting them, and even solving common problems.
Peloton bikes have become a favorite for home fitness. Many riders love the interactive classes and smooth ride. But if your feet aren’t properly connected to the pedals, you might lose power, feel uncomfortable, or even risk injury. Whether you’re new to cycling or just new to Peloton, learning about cleats can make your workouts safer and more effective.
This guide is written for everyday riders, not cycling experts. You’ll find clear explanations, practical advice, and some tips that even experienced Peloton users miss.
What Are Peloton Bike Cleats?
Bike cleats are small metal or plastic attachments that screw onto the bottom of your cycling shoes. Their main job is to connect your shoes securely to the pedals. When you “clip in,” your feet become part of the bike, which lets you pedal harder and more smoothly.
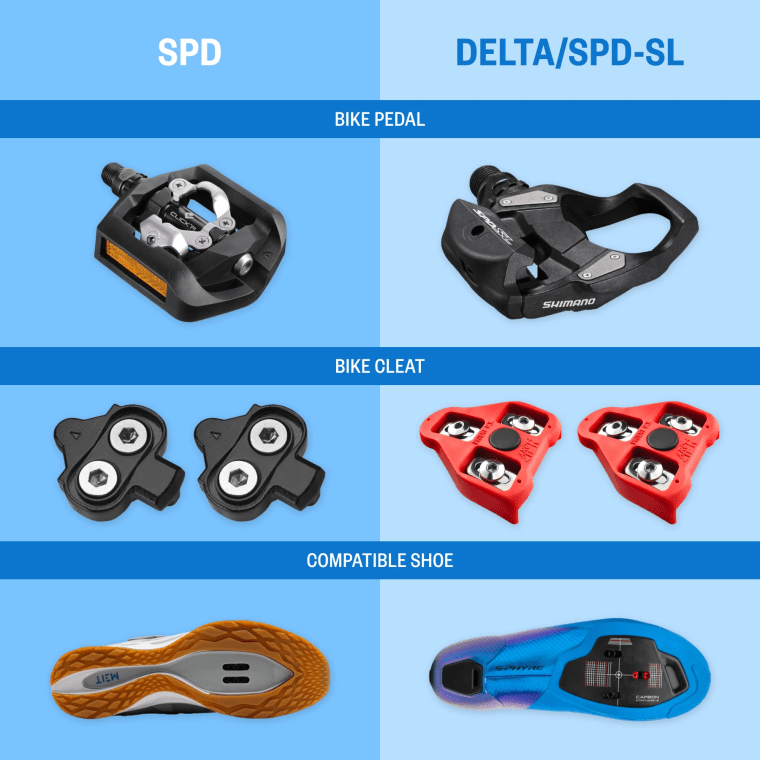
Peloton uses the LOOK Delta system for its pedals. This means you need shoes with three holes in the bottom (called “3-bolt” shoes) and cleats designed to fit this system. If you try to use other types of cleats, like SPD (which use two bolts), they won’t fit Peloton pedals.
Here’s how cleats work:
- Cleats attach to the shoe sole with screws.
- When you step onto the pedal, the cleat locks into the pedal mechanism.
- To release, you twist your heel outward.
This lock-in system improves your cycling power, keeps your feet stable, and helps prevent injuries. Studies show that using clip-in pedals can improve pedaling efficiency by up to 15%. But you need the right cleats and shoes.
Types Of Cleats Compatible With Peloton
Peloton bikes use LOOK Delta pedals. Not all cleats fit these pedals, so you need to choose carefully. Here are the main types of cleats and their compatibility:
| Cleat Type | Number of Bolts | Fits Peloton? | Notes |
|---|---|---|---|
| LOOK Delta | 3 | Yes | Officially recommended by Peloton |
| SPD-SL | 3 | No | Similar shape, but not compatible |
| SPD | 2 | No | Common on spin bikes, not Peloton |
| Keo | 3 | No | LOOK Keo is different from Delta |
LOOK Delta cleats are the only type that fit Peloton pedals. They are easy to find online or at bike shops. Peloton sells their own branded version, but other brands like Shimano or Venzo also make compatible cleats.
One insight many beginners miss: SPD cleats are the most common on gym spin bikes, but they are not compatible with Peloton. Always check for “LOOK Delta” on the packaging.
Choosing The Right Shoes For Your Cleats
You can’t use cleats with just any shoe. You need cycling shoes made for cleats. Here’s what matters:
Shoe Compatibility
Peloton bikes need shoes with a 3-bolt pattern on the sole. This means there are three holes arranged in a triangle. If you have shoes with only two holes, or no holes, they won’t work. Many brands make shoes for LOOK Delta cleats, including Peloton, Shimano, and others.
Shoe Fit And Comfort
Cycling shoes should fit snugly but not hurt. If they’re too loose, your foot can slide and cause blisters. If they’re too tight, you might feel numbness. Try shoes on before buying, or check size charts carefully if ordering online.
A good cycling shoe has:
- Stiff sole: Transfers more power to the pedals.
- Ventilation: Keeps your feet cool.
- Velcro or ratchet closures: Let you adjust fit quickly.
Beginners often choose shoes based only on price. But comfort and fit matter more than brand. If your shoes hurt, you won’t enjoy your workout.
Popular Shoe Brands For Peloton
Some reliable brands for Peloton-compatible shoes include:
- Peloton: Their own shoes are designed for the bike, but sizing runs narrow.
- Shimano: Known for durability and comfort.
- Venzo: Affordable and easy to use.
- Tommaso: Good for wider feet.
- Fizik: High-end, stylish, but expensive.
Most cycling shoes come in both men’s and women’s sizes. Make sure to check the fit and return policy before buying.
How To Install Cleats On Your Shoes
Installing cleats sounds tricky, but it’s simple if you follow these steps:
- Gather Tools and Parts: You need your shoes, cleats, screws (usually included), and a Phillips screwdriver.
- Position the Cleats: Place the cleat over the three holes on the shoe’s sole. Most cleats have markings to help you center them. The center of the cleat should be below the ball of your foot.
- Align for Comfort: Point the cleat straight forward. Some riders angle their cleats slightly outward for comfort, but straight is safest for beginners.
- Insert Screws: Put screws through the cleat holes and into the shoe. Tighten evenly. Don’t overtighten; you can strip the threads.
- Check Movement: Wiggle the cleat to make sure it’s tight and doesn’t move.
- Test Fit: Wear your shoes and practice clipping in and out on the bike. If it feels wrong, adjust the cleat’s position and retighten.
Most people spend about 10 minutes installing cleats. One common mistake: not tightening screws enough. Loose cleats can cause falls.
Adjusting Cleats For Comfort And Performance
Proper cleat alignment matters for both comfort and safety. Poor alignment can cause knee pain, hip discomfort, or loss of power.
Cleat Position
- Forward/Backward: Start with the cleat centered under the ball of your foot. Moving the cleat forward increases power, but too much can stress your Achilles tendon. Moving it back increases comfort.
- Side-to-Side: Center the cleat, but if you feel knee pain, you can move it slightly inward or outward.
- Angle: For most people, keep the cleat straight. If your toes point outward naturally, you might angle the cleat to match.
Testing Alignment
Ride for 10-15 minutes and notice how your knees, hips, and ankles feel. If you feel pain, adjust the cleat slightly and test again. Small changes can make a big difference. Don’t ignore discomfort—bad cleat alignment can cause lasting injuries.
A non-obvious insight: Many riders think knee pain is caused by the bike setup, but often it’s cleat alignment. Adjusting cleats can solve pain that bike adjustments cannot.
Clipping In And Out: Tips For Beginners
Clipping in can feel scary at first. Here’s how to do it smoothly:
- Clipping In: Place your shoe over the pedal. Push down firmly until you hear a “click.” If you don’t hear it, try again. It may take a few tries to get used to the feeling.
- Clipping Out: Twist your heel outward (away from the bike). This releases the cleat from the pedal. Always practice unclipping before your first ride.
Some riders struggle at first. It’s normal to feel awkward. Practicing off the bike (on carpet) helps build confidence. If you can’t unclip easily, check if your cleats are too tight or worn.
Another tip: If you ever fall or panic, twisting your heel outward will unclip your shoe. This is safer than pulling your foot up.
Cleat Float: What It Is And Why It Matters
Cleat float means the amount your foot can move side-to-side while clipped in. More float allows some natural movement, which can reduce knee pain. Less float keeps your foot locked in place.
LOOK Delta cleats come in two main types:
- Red cleats (9° float): Allow more movement. Good for beginners or people with knee issues.
- Black cleats (0° float): No movement. Good for experienced riders who want maximum power.
| Cleat Color | Float Angle | Best For | Notes |
|---|---|---|---|
| Red | 9° | Beginners, knee pain | Most forgiving |
| Black | 0° | Advanced riders | Maximum power, less comfort |
Most Peloton users choose red cleats for comfort. If you have knee pain, float can help. But too much float can feel unstable. Try both if you’re not sure.
Maintaining Your Cleats
Cleats wear out over time, especially if you walk on hard floors. Worn cleats can make clipping in difficult or cause you to slip.
Signs Your Cleats Need Replacing
- Difficulty clipping in/out
- Visible cracks or wear
- Loose feeling on pedals
- Squeaking noises
Most riders need to replace cleats every 6-12 months, depending on use. Heavy riders or those who walk a lot in their cycling shoes may need to replace them sooner.
Tips For Longer Cleat Life
- Avoid walking on hard floors: Cleats are made for cycling, not walking.
- Check screws regularly: Tighten if loose.
- Clean cleats with a damp cloth: Dirt can cause sticking.
Proper care extends cleat life and keeps your rides safe.
Troubleshooting Common Cleat Problems
Even with the right setup, issues can happen. Here’s how to fix them:
Difficulty Clipping In
If you can’t clip in easily:
- Check if your cleat is worn or dirty.
- Make sure your cleat is aligned correctly.
- Try adjusting the tension on the pedal (some Peloton pedals allow this).
Difficulty Clipping Out
If you feel stuck:
- Try twisting your heel out more forcefully.
- Clean the cleat and pedal.
- Replace the cleat if it’s damaged.
Knee Pain
Often caused by poor cleat alignment. Adjust the angle or position, and test again.
Squeaky Cleats
Usually from dirt or loose screws. Clean and tighten.
Loose Feeling
If your foot wiggles, the cleat may be worn or screws loose. Replace or retighten.
One advanced tip: If you often have trouble clipping in or out, lubricate the cleat lightly with silicone spray. Avoid oil-based lubricants—they attract dirt.
Comparing Peloton And Other Bike Cleats
Peloton uses LOOK Delta, but what about other bikes? Here’s a quick comparison to help you understand differences.
| Bike Brand | Pedal Type | Cleat Required | Easy for Beginners? |
|---|---|---|---|
| Peloton | LOOK Delta | LOOK Delta | Yes |
| Schwinn | SPD | SPD | Yes |
| SoulCycle at home | Dual (Delta/SPD) | Either | Yes |
| Echelon | SPD | SPD | Yes |
Peloton sticks with LOOK Delta for all their bikes. Some home bikes offer dual pedals, so you can use sneakers or SPD cleats. If you switch bikes, check which cleat system is used.
Buying Peloton Bike Cleats: What To Look For
When buying cleats, consider these key factors:
- Compatibility: Only LOOK Delta fits Peloton. Avoid SPD or Keo unless your bike has dual pedals.
- Float: For most beginners, red (9° float) is best.
- Durability: Choose brands known for quality, like Shimano or Venzo.
- Price: Cleats cost $15–$25 per pair. More expensive doesn’t always mean better.
- Ease of Installation: Some cleats have clear markings for alignment.
Avoid cheap, unknown brands—poor materials can wear out quickly or fail while riding.
One common mistake: Buying SPD cleats by accident. Always check for “LOOK Delta” before purchasing.
How To Clean And Care For Your Cleats
Cleat care is simple but important. Dirty or damaged cleats can cause slipping or sticking.
- Wipe cleats after each ride: Use a damp cloth to remove dust and sweat.
- Check screws weekly: Tighten if needed.
- Inspect for cracks: Replace if damaged.
For deeper cleaning, remove cleats from shoes and soak them in warm, soapy water. Dry thoroughly before reinstalling.
Cycling shoes can be wiped with a damp cloth. Do not put cycling shoes in the washing machine—this can damage the sole and cleat mounts.
Safety Tips For Using Cleats
Using cleats safely is important for your health and confidence.
- Practice unclipping: Before riding, practice clipping in and out several times.
- Adjust cleat position for comfort: Don’t ignore pain—adjust alignment.
- Check cleats before every ride: Loose or damaged cleats increase injury risk.
- Don’t walk on slippery floors: Cleats can slide and cause falls.
If you’re new, start with lower resistance on the bike. This makes unclipping easier and reduces strain.
Advanced Cleat Setup: Customizing For Your Body
Every rider is different. If you want to take your cleat setup to the next level, consider a bike fit. Professional bike fitters use tools to measure your foot, leg, and hip angles. They then adjust your cleat position to match your body.
For Peloton riders, you can do a basic fit at home:
- Sit on the bike and pedal slowly.
- Watch your knees—do they move straight up and down, or wobble sideways?
- Adjust cleat angle so your knees track straight.
- If you have a history of knee injuries, consider more float.
Bike fitting can reduce pain, increase power, and prevent injuries. For serious riders, a professional fit costs $100–$300 and is often worth it.
How Often To Replace Cleats
Cleats wear out faster than most people expect. Here’s what affects lifespan:
- Frequency of rides: Daily riders need new cleats every 3–6 months.
- Amount of walking: Walking on hard floors wears cleats quickly.
- Quality of cleats: Cheap cleats break sooner.
Check your cleats monthly. If you notice difficulty clipping in, replace them. A new pair is cheaper than risking injury.
Peloton Cleats For Wide Feet And Special Needs
If you have wide feet, finding comfortable shoes and cleats can be challenging. Look for brands that offer wide sizes, like Tommaso or Shimano.
If you have foot pain or unique needs, consider custom insoles or see a specialist. Some riders use orthotic inserts for extra comfort.
Peloton shoes are known to run narrow. If you struggle, switch to another brand.
Traveling With Peloton Shoes And Cleats
If you travel and use Peloton bikes at hotels or gyms, bring your own shoes and cleats. Most commercial Peloton bikes use the same pedals, but always check before your trip.
Keep a spare pair of cleats in your bag. If your cleats break while traveling, you can’t ride safely.
Peloton Bike Cleats: Myths Vs Facts
Many myths surround bike cleats. Let’s clarify some common ones:
- Myth: You must use Peloton-branded cleats.
Fact: Any LOOK Delta cleat works.
- Myth: Cleats are dangerous for beginners.
Fact: Cleats improve safety and power if used correctly.
- Myth: Cleats cause knee pain.
Fact: Poor alignment causes pain, not cleats themselves.
- Myth: You can walk comfortably in cycling shoes.
Fact: Cleats are not made for walking. Use shoe covers if needed.
Understanding these myths helps you make smart decisions.
:max_bytes(150000):strip_icc()/peloton-cycling-shoes-5dc1f4a64d2143d3939e726042e24128.jpg)
Peloton Bike Cleats And Home Workouts
Clip-in pedals make Peloton workouts smoother and more effective. If you’re serious about fitness, using cleats increases your power and reduces injury risk. Studies show that cyclists using clip-in pedals burn up to 10% more calories per session compared to those using regular pedals.
For group rides or competitive classes, cleats help you keep up with the pace. Most Peloton instructors recommend them for all levels.
Where To Buy Peloton Cleats
You can buy cleats:
- On Peloton’s official website
- At local bike shops
- Online retailers like Amazon, REI, or Walmart
- Specialty cycling stores
Always check for “LOOK Delta” compatibility. If unsure, ask for help at the store.
For more information on pedal systems and cleats, visit Wikipedia.
Frequently Asked Questions
What Type Of Cleats Do Peloton Bikes Use?
Peloton bikes use LOOK Delta cleats. These cleats have three holes and fit only the Peloton pedal system. SPD or Keo cleats are not compatible.
How Do I Know If My Cleats Need Replacing?
If you have trouble clipping in or out, see cracks or heavy wear, or hear squeaking noises, it’s time to replace your cleats. Most people change cleats every 6–12 months.
Can I Use Regular Gym Shoes On A Peloton Bike?
No, regular gym shoes do not work with Peloton pedals. You need cycling shoes with a 3-bolt pattern and LOOK Delta cleats.
Are Peloton-branded Cleats Better Than Other Brands?
Peloton-branded cleats are designed for their bike, but other brands like Shimano or Venzo work just as well. The key is LOOK Delta compatibility.
How Can I Make Clipping In And Out Easier?
Practice off the bike first. Adjust your cleat and pedal tension if possible. Keep cleats clean, and replace them if they are worn.
Peloton bike cleats may seem complicated at first, but with the right shoes, installation, and care, they make your workouts safer and more enjoyable. Remember to check compatibility, adjust for comfort, and replace cleats regularly. With this guide, you’re ready to ride confidently and get the most from every Peloton session.
