Every home gym enthusiast eventually faces a simple but important question: “Will I need to assemble my dip station?” This is not just about time or tools; it’s about knowing what you’re getting into before you order, unbox, and try to set up your new piece of fitness equipment. Whether you’re a beginner, a seasoned athlete, or somewhere in between, understanding the assembly demands of dip stations helps you avoid surprises and make smarter buying decisions.
Dip stations are loved for their ability to strengthen the upper body, especially the chest, triceps, and shoulders. But not all dip stations are the same. Some arrive ready to use, while others demand an hour, some tools, and a bit of patience.
This article takes you through everything about dip station assembly, from what to expect when your package arrives to the tools you’ll need, common challenges, and tips for a smooth setup. By the end, you’ll know exactly what kind of assembly is required, whether you’ll need help, and how to avoid the mistakes that often frustrate first-time buyers.
What Is A Dip Station?
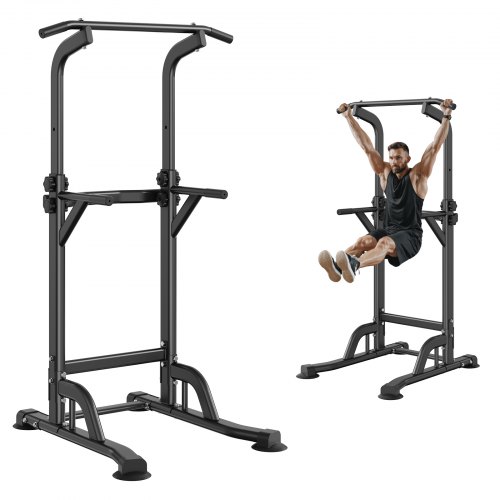
A dip station is a piece of exercise equipment designed to help you perform dips—an effective bodyweight movement that targets the upper body. Some dip stations are simple parallel bars, while others are multi-functional units that also support leg raises, push-ups, or even pull-ups. They are popular in home gyms because they don’t take up much space and deliver excellent workout value.
There are several types:
- Freestanding dip stations: Usually consist of two parallel bars on a stable frame.
- Wall-mounted dip bars: Fixed to a wall for maximum stability.
- Power towers: Tall, all-in-one units offering dips, pull-ups, and sometimes other exercises.
- Portable dip bars: Lightweight, sometimes foldable, for easy storage and transport.
Each type has different assembly needs, which we’ll cover in depth.
Why Assembly Matters
People often overlook assembly until their equipment arrives. But the way a dip station is put together affects:
- Safety: Poor assembly can lead to wobbling or even collapse during use.
- Durability: Correct assembly ensures the structure lasts longer.
- Time to first use: Some dip stations are ready right out of the box, while others take an hour or more to assemble.
- Space planning: If a station needs assembly, you’ll need space not just for the final product, but for the assembly process.
Many buyers don’t realize that even similar-looking dip stations can have very different assembly requirements. It’s important to check before you buy.
Types Of Dip Stations And Their Assembly Needs
Not all dip stations are the same, and the type you choose affects how much assembly is involved.
Freestanding Dip Stations
These are among the most common for home use. They usually arrive in a box with the frame disassembled to save shipping space.
- Assembly Required: Yes, in almost all cases. The bars, base supports, and sometimes handles come separately and must be bolted together.
- Tools Needed: Usually basic hand tools, such as an adjustable wrench or Allen key (often included).
- Typical Time: 20-40 minutes for most models.
- Example: The Sportsroyals Power Tower arrives as several large pieces, with bolts and a manual.
Wall-mounted Dip Bars
These offer great stability but demand both assembly and proper installation.
- Assembly Required: Yes, and installation to a wall (drilling required).
- Tools Needed: Power drill, wrench, level, measuring tape.
- Typical Time: 30-60 minutes, depending on your DIY skills.
- Example: The Ultimate Body Press Wall Mount Dip Bar requires attaching arms to the wall brackets, then securing the brackets to wall studs.
Power Towers
These are multi-exercise frames, taller and heavier than basic dip stations.
- Assembly Required: Yes, and usually the most complex among dip stations.
- Tools Needed: Wrenches, possibly a socket set, sometimes a screwdriver.
- Typical Time: 45-90 minutes. Some users report needing two people for heavy parts.
- Example: The Stamina Power Tower comes in a flat box and takes at least an hour to assemble.
Portable And Foldable Dip Bars
Designed for quick setup and easy storage, these often have minimal assembly.
- Assembly Required: Sometimes. Some fold out with no tools, others need a few screws.
- Tools Needed: Usually included, or none.
- Typical Time: 5-15 minutes.
- Example: Lebert Equalizer bars simply snap together and are ready to use.
What To Expect When Your Dip Station Arrives
When your dip station arrives, don’t be surprised if it comes in a flat or long box with several parts inside. Manufacturers package equipment this way to keep shipping costs down and reduce the chance of damage.
Here’s what you’ll likely find inside:
- Main support bars: The largest pieces, usually two or four.
- Base connectors: Stabilize the frame.
- Bolts, nuts, and washers: In a small bag, sometimes with spares.
- Handles or arm pads: For comfort.
- Instruction manual: Sometimes clear, sometimes confusing.
- Tools: Some brands include a basic wrench or Allen key.
It’s smart to lay everything out before starting assembly. Missing parts are rare but can happen. Count everything against the manual’s parts list. If something’s missing, contact the seller before starting.
Assembly Steps: What Most Users Will Do
While every dip station has its own design, most require similar assembly steps. Here’s a general outline:
- Unpack all parts and check against the manual.
- Attach base supports to the main vertical bars. This step provides the frame’s stability.
- Secure horizontal bars (if present) that connect both sides.
- Install handles or pads for comfort.
- Tighten all bolts and nuts, but don’t overtighten until the frame is square and level.
- Check stability before use.
Some advanced models require extra steps, like attaching weight plate holders or resistance bands.
Example Assembly: Freestanding Dip Station
Suppose you purchased a basic freestanding dip station. Here’s a sample assembly process:
- Lay out both vertical bars parallel to each other.
- Attach the base support to each bar with bolts.
- Connect the two sides with crossbars.
- Secure handles if separate.
- Double-check that everything is tight and level.
This process takes about 30 minutes for most people.
Tools You Might Need
Most dip station kits include the necessary tools, but sometimes you’ll want to use your own for comfort or better leverage.
Common tools:
- Adjustable wrench: For tightening bolts and nuts.
- Allen key (hex key): Often included in the package.
- Screwdriver: Sometimes needed for handle covers.
- Socket set: Useful for larger bolts, especially on power towers.
- Power drill: For wall-mounted units.
If you don’t own these tools, most hardware stores sell affordable kits. Using better tools can speed up assembly and reduce frustration.

How Long Does Assembly Take?
Assembly time depends on:
- Type of dip station
- Your DIY experience
- Clarity of instructions
- Tools available
Here’s a quick comparison:
| Type | Assembly Time (Average) | Tools Needed | DIY Difficulty |
|---|---|---|---|
| Freestanding | 20-40 minutes | Wrench, Allen key | Easy |
| Wall-mounted | 30-60 minutes | Drill, Wrench, Level | Moderate |
| Power tower | 45-90 minutes | Wrenches, Socket set | Challenging |
| Portable | 5-15 minutes | None/Included | Very easy |
Pro tip: If you’re not handy, ask a friend for help or consider hiring someone. Some stores even offer assembly services.
Common Assembly Problems And How To Fix Them
It’s normal to face some challenges when assembling fitness equipment. Here are the most common issues—and how to solve them:
- Missing Parts: Contact the seller or manufacturer right away. Most will send replacements for free.
- Misaligned Holes: Sometimes holes don’t line up perfectly. Loosen all bolts slightly, then try again. Tightening one side fully often causes the other to misalign.
- Confusing Instructions: If the manual is unclear, look for video guides online. Many brands have official YouTube channels.
- Wobbly Frame: Make sure all bolts are tight and the floor is level. Adding a rubber mat under the station can help.
- Damaged or Scratched Parts: Take photos and contact customer service immediately. Most reputable brands will replace damaged parts.
If you’re struggling, don’t force pieces together. Forcing parts can damage them and make the unit unsafe.
Tips For A Smooth Assembly
Setting up your dip station doesn’t have to be stressful. Here are some tips from experienced users:
- Read the manual first: Don’t skip this step, even if you think it’s obvious.
- Clear a space: Assembly is easier with room to move. Avoid doing this in a cramped area.
- Lay out all parts: Organize nuts, bolts, and bars before starting.
- Use your own tools: Included tools often work, but your own will be more comfortable.
- Leave bolts slightly loose until the frame is complete, then tighten everything.
- Test stability: Before your first workout, push and pull the station to check if it wobbles.
- Ask for help: Some parts are heavy or awkward. A second pair of hands can prevent accidents.
Assembly-free And Minimal Assembly Options
If you want a dip station but hate the idea of assembly, there are choices for you.
Pre-assembled Dip Stations
Some specialty brands offer pre-assembled dip stations, but these are rare and often expensive due to shipping costs. They arrive ready to use, but you’ll need to check the size—large, assembled units can be hard to fit through doors or into small rooms.
Minimal Assembly Models
Some portable dip bars, like the Lebert Equalizer, require only a quick snap-together process. These are ideal for people who live in apartments or don’t own tools. However, they may be less stable for heavy or intense workouts.
Folding Dip Bars
Folding models are designed for easy transport and storage. Assembly is usually limited to unfolding and securing a couple of pins—no tools needed.

When To Consider Professional Assembly
If you’re not comfortable with tools or want to save time, professional assembly is an option. Some retailers offer this service for a fee, usually between $50 and $100, depending on the complexity.
Professional assembly makes sense if:
- You’re short on time.
- You’re unsure about following instructions.
- The dip station is very heavy or large (like a power tower).
- You want to avoid any risk of incorrect assembly.
Hiring a professional ensures your station is safe and ready to use immediately.
How Assembly Affects Safety And Performance
Assembly isn’t just about getting your dip station ready—it directly affects your safety and how well the equipment works.
- Loose bolts can cause wobbling or collapse.
- Incorrect assembly may void the warranty.
- Uneven frames can change exercise angles, risking injury.
- Proper assembly ensures stability, which means better workouts and a longer lifespan for your equipment.
Don’t rush the process. Taking an extra 10 minutes now can prevent injuries and repairs later.
Comparing Popular Dip Station Models And Their Assembly Requirements
Here’s a look at how some of the most popular dip stations compare when it comes to assembly:
| Brand & Model | Assembly Needed? | Estimated Time | Special Notes |
|---|---|---|---|
| Lebert Equalizer | Minimal | 5-10 min | Snaps together, no tools |
| Sportsroyals Power Tower | Yes | 60 min | Heavy, may need two people |
| Ultimate Body Press Wall Bar | Yes | 45 min | Requires wall mounting |
| ProsourceFit Dip Stand | Yes | 20 min | Basic hand tools only |
| Fuel Pureformance Dip Station | Yes | 30 min | Simple assembly, sturdy |
This comparison shows that most dip stations require at least some assembly. The exception is lightweight, portable options. Always check product reviews to see what real users say about the assembly process—sometimes the manufacturer’s estimate is optimistic.
Assembly Mistakes To Avoid
Many beginners make simple assembly mistakes that can cause problems. Here are the most common, and how to avoid them:
- Not reading the manual: Skipping instructions often leads to missed steps or leftover parts.
- Tightening bolts too soon: This can misalign holes and make assembly harder.
- Using the wrong tools: The included tools are sometimes flimsy. Use your own if you can.
- Ignoring weight limits: Don’t exceed the recommended user weight after assembly.
- Not checking for wobble: Always test stability before your first workout.
A little patience goes a long way. Most mistakes are easy to fix if you spot them early.
What To Do If You’re Stuck
If you’re struggling with assembly, don’t give up. Here’s what you can do:
- Check for video guides: Many brands post assembly videos on YouTube.
- Contact customer support: Most companies respond quickly to questions.
- Join online forums: Fitness communities often help new users with assembly issues.
- Ask a friend or neighbor: Sometimes a second set of eyes is all you need.
One non-obvious tip: If a bolt won’t fit, try switching it with another from the kit. Some bolts are very similar in size, and mixing them up is a common issue.
Should You Buy A Pre-assembled Dip Station?
Pre-assembled dip stations offer instant use and maximum convenience, but they come with higher costs and shipping challenges. They’re best for commercial gyms or buyers who want zero setup. For most home users, the small amount of assembly required is manageable—and saves money.
Pro insight: Some specialty retailers, like Rogue Fitness, offer partial assembly options. Large pieces arrive together, but you may still need to connect main sections. This balances convenience and shipping cost.
Real User Stories And Insights
Many first-time buyers are surprised by how much easier assembly is than expected—especially with freestanding or portable models. A common theme in user reviews is that the hardest part is unpacking and organizing parts, not the assembly itself.
One beginner user shared: “I was worried about putting my dip station together, but it only took me 25 minutes. The hardest part was figuring out which bolts went where. Once I laid everything out, the rest was simple.”
Another user mentioned: “My power tower needed two people to stand up safely, but the instructions were clear. I’m glad I waited for a friend to help.”
Non-obvious insight: Assembly is also a good way to learn about your equipment. You’ll know how it fits together, making future maintenance or moving much easier.
Extra Assembly Tips For Maximum Safety
- Double-check tightness after the first workout: Sometimes bolts loosen with initial use.
- Use thread locker for long-term stability: A drop of thread-locking fluid on bolts can prevent loosening.
- Place on a level surface: Uneven floors cause wobbling, even with perfect assembly.
- Inspect regularly: Check bolts and frame every month.
Most dip station accidents happen not during assembly, but because bolts loosen over time.
Dip Station Assembly And Warranty
Improper assembly can void your equipment’s warranty. Most manufacturers clearly state that only correct assembly is covered. Save your receipt, manual, and take photos of your finished dip station. If a part fails, these are often required for warranty claims.
For more details on warranty policies for exercise equipment, see this Wikipedia entry.
Frequently Asked Questions
Do All Dip Stations Require Assembly?
Most dip stations require at least basic assembly, especially freestanding, power tower, and wall-mounted models. Portable or folding dip bars sometimes need only minimal setup. It’s rare to find a completely pre-assembled dip station unless you buy from specialty retailers.
Is Assembly Difficult For Beginners?
Assembly is usually straightforward, especially with freestanding and portable models. Wall-mounted and power tower units are more complex and may need two people. Reading the manual, organizing parts, and using the right tools make the process easier for beginners.
What If I Lose The Assembly Manual?
Many manufacturers offer digital manuals on their websites. You can also search for your dip station’s brand and model on YouTube for video guides. Customer service can email you a replacement manual if needed.
How Much Space Do I Need For Assembly?
Allow at least twice the floor space as the final dip station footprint. This gives you room to lay out parts and move around. For power towers, you may need even more space to stand up the frame safely.
Can I Move A Dip Station After Assembly?
Yes, most dip stations can be moved after assembly. Portable models are easy to pick up and store. Larger stations, like power towers, are heavy and may need two people to move safely. Always recheck bolt tightness after moving.
Every dip station offers great benefits, but a smooth assembly process makes your first workout even more enjoyable. With the right knowledge and a little patience, you’ll have your new equipment ready and safe in no time.
