Using a dip station can transform your upper body strength and muscle tone, but only if you use it the right way. Many people jump onto a dip station without knowing proper form, leading to weak results or even injury. When you take the time to learn correct technique, a dip station becomes a powerful tool for building triceps, chest, and shoulder muscles, whether you are a beginner or advanced athlete.
A dip station is not complicated, but it demands respect for safety, body alignment, and progression. This guide will show you how to use a dip station correctly, from setting up and warming up, to perfecting your technique and using advanced variations.
You will also learn how to choose the right dip station, avoid common mistakes, and design a complete dip station workout. Even if you have never used one before, you’ll leave with the confidence to get started and see real results.
What Is A Dip Station And Why Use It?
A dip station is a piece of exercise equipment made of two parallel bars, usually mounted on a solid frame. You hold the bars with your hands, lift your body, and lower yourself down, using your own body weight as resistance. Some dip stations are stand-alone, while others are attached to power racks or wall-mounted.
People use dip stations for several reasons:
- Strengthens upper body muscles: Dips work your triceps, chest, shoulders, and even your core.
- Functional movement: The dip motion mimics pushing actions in daily life and sports.
- Bodyweight training: No weights are needed; you use your own weight to build muscle.
- Versatility: You can change the grip, add weight, or do variations for different goals.
A dip station is found in almost every gym, but it’s also popular for home workouts because it takes up little space and offers many exercise options.
Choosing The Right Dip Station
Picking the right dip station is important for safety and comfort. Not all dip stations are made the same, so look for these key features:
- Sturdy frame: The equipment should not wobble or shake when you use it.
- Proper bar width: For most people, the distance between bars should be about 18 to 24 inches. Too wide or too narrow can strain your shoulders or wrists.
- Comfortable grips: Foam or rubber grips are easier on your hands.
- Weight capacity: Check that the station supports your weight, plus any extra if you plan to add resistance.
- Height: You need enough clearance from the floor so your feet don’t touch during dips.
Some dip stations come with extra features, like adjustable height or bars that fold for storage. For home gyms, compact designs are helpful. In commercial gyms, stations are usually fixed and more robust.
Here’s a quick comparison of common dip station types:
| Dip Station Type | Best For | Pros | Cons |
|---|---|---|---|
| Stand-Alone Parallel Bars | Home gyms | Portable, affordable, easy to store | May wobble if very light |
| Wall-Mounted Dip Bars | Permanent home or gym setups | Very stable, saves floor space | Requires installation, not portable |
| Power Tower | All-in-one home gyms | Multiple exercises (pull-ups, dips) | Needs more space, higher cost |
| Commercial Gym Dip Stations | Public gyms, heavy use | Extremely sturdy, high weight capacity | Expensive, not for home use |
A non-obvious detail: bar thickness matters. Thicker bars (1.5–2 inches) are harder to grip for small hands but are more comfortable for heavy dips. Try a few types if possible before you buy or commit.
Preparing For Dips: Warm-up And Mobility
Jumping straight into dips without a warm-up is a common mistake. Dips put a lot of stress on your shoulders, elbows, and wrists. A good warm-up increases blood flow and reduces your risk of injury.
Start with 5–8 minutes of light cardio, like brisk walking or jumping jacks. Then, do dynamic movements for your upper body:
- Arm circles: 20 forward, 20 backward.
- Shoulder rolls: 20 times each way.
- Elbow rotations: Gentle circles with your arms bent.
- Wrist stretches: Flex and extend each wrist, hold for 10–15 seconds.
- Band pull-aparts: Using a resistance band, pull your hands apart to activate your back and shoulders.
If you have stiff shoulders, spend extra time on shoulder mobility. Try wall slides or gentle stretches to open your chest and lats.
A tip beginners often miss: warm up your grip. Squeeze a tennis ball or do a few dead hangs from a pull-up bar. This helps you hold the bars securely during dips.
Setting Up For Your First Dip
Before you do your first dip, check your equipment and body position.
- Adjust bar height: Make sure you can hang with straight arms without your feet touching the ground.
- Grip: Hold the bars with your palms facing in, thumbs wrapped around. Your wrists should be straight, not bent backward.
- Shoulder position: Pull your shoulders down and back. Think about keeping your chest proud.
- Core tightness: Brace your abs. This keeps your body from swinging.
- Legs: Bend your knees and cross your ankles behind you, or keep your legs straight if the station is high enough.
- Head: Keep your neck in line with your spine. Look straight ahead, not down.
Before you lower yourself, take a deep breath and engage your muscles. You are now ready for your first dip.
How To Perform A Standard Dip: Step-by-step
Correct form is more important than how many reps you do. Follow these steps for a classic dip:
- Start at the Top: Support your body on locked-out arms. Shoulders down, chest up, abs tight.
- Lower Slowly: Bend your elbows and lower your body. Keep your elbows close to your body, not flaring out wide. Lean slightly forward if you want to target your chest more, or stay upright for more triceps focus.
- Go Deep, But Not Too Deep: Lower yourself until your upper arms are about parallel to the floor. Do not go so low that you feel a stretch or strain in the front of your shoulders.
- Pause Briefly: Hold at the bottom for half a second. This removes momentum and makes your muscles work harder.
- Push Up Strong: Press through your palms and straighten your arms to lift your body back to the top. Avoid locking your elbows harshly.
- Repeat for Reps: Keep each rep controlled. Do not bounce or swing your legs.
Aim for 2–4 sets of 6–12 reps if you are a beginner. If you can do more than 12 with good form, consider adding weight or using a harder variation.
A common mistake: going too deep. This can injure your shoulders. If you feel pain or discomfort in your shoulder joint, stop and use a smaller range of motion.
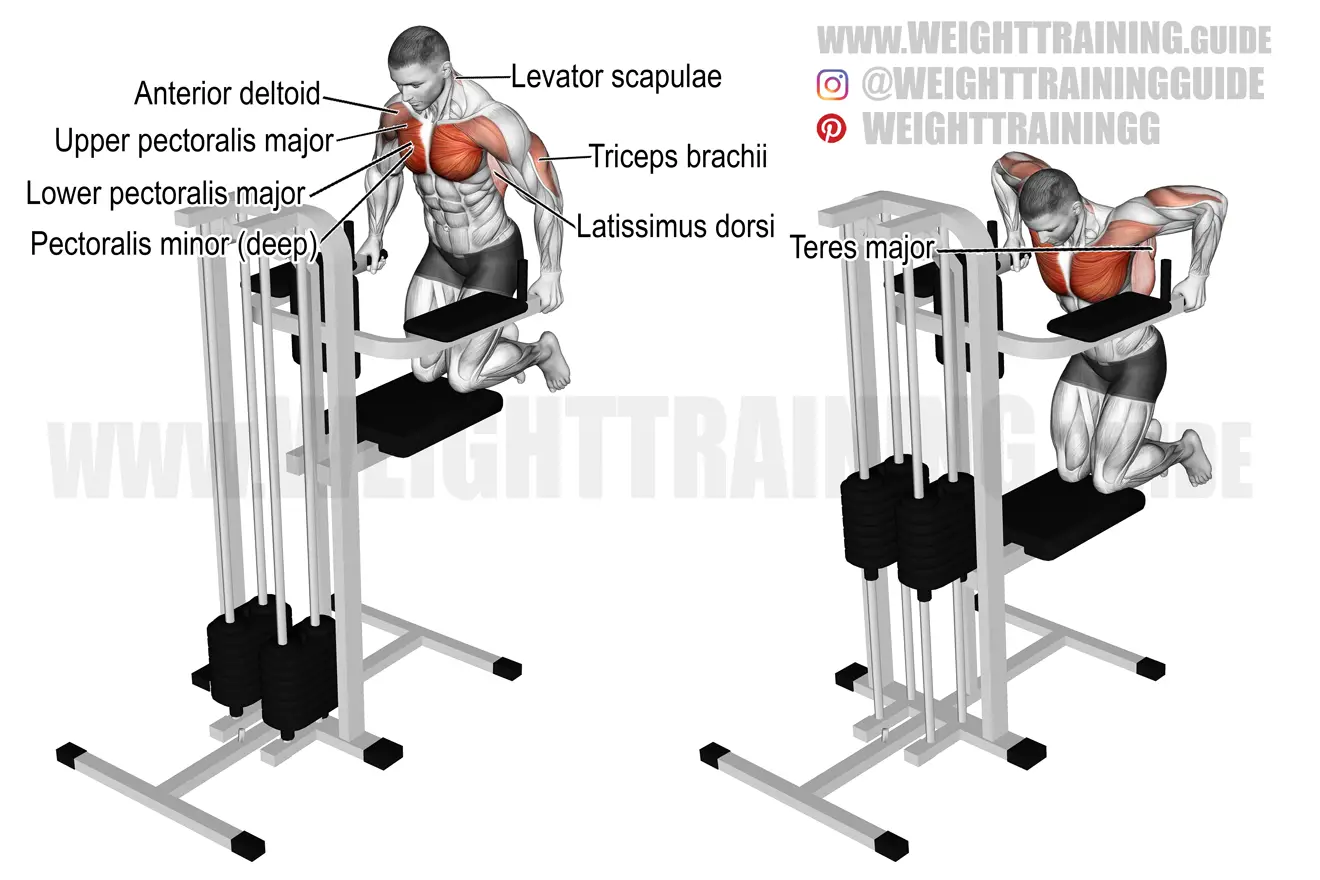
Triceps, Chest, Or Shoulders: Targeting Muscles With Grip And Angle
You can change which muscles work hardest by adjusting your body position:
- Upright posture: Focuses on triceps.
- Leaning forward: Shifts more work to your chest.
- Narrow grip: Hits the triceps more.
- Wider grip: Activates chest and shoulders.
Here’s a quick comparison of grip width and muscle focus:
| Grip Width | Main Muscles Worked | Notes |
|---|---|---|
| Narrow (16–18 inches) | Triceps, inner chest | Harder on elbows, good for arm growth |
| Standard (20–22 inches) | Chest, triceps, shoulders | Best for most people, balanced strength |
| Wide (24+ inches) | Chest, front shoulders | Can strain shoulders if not flexible |
Changing your angle even slightly makes a big difference. For example, a 10-degree forward lean can increase chest activation by up to 20% compared to a strict upright dip.
Dip Variations For All Levels
Once you master the basic dip, try these variations to challenge yourself or match your goals.
Assisted Dips
If you can’t do a full dip yet, use assistance bands or a dip machine. Loop a band under your knees or feet to help lift you. Most gyms have an assisted dip machine where you kneel on a pad.
Negative Dips
Jump up to the top position, then lower yourself as slowly as possible. This builds strength for full dips and is easier than pushing up.
Bench Or Chair Dips
Place your hands on a bench behind you, feet on the floor. Lower and raise your body. This is easier than parallel bar dips but works similar muscles. Be careful not to let your shoulders roll forward.
Weighted Dips
Add a dip belt with weights, or hold a dumbbell between your feet. Only do this when you can do 12+ bodyweight dips with perfect form.
Ring Dips
Hang gymnastic rings from a pull-up bar or ceiling. Dips on rings force your body to stabilize, working more muscles and coordination.
Plyometric Dips
Explode up at the top, trying to lift your hands slightly off the bars. This builds power and speed.
Korean Dips
Face the bars from the side, grip them behind you, and dip down with your chest facing up. This is an advanced move for shoulder and core strength.
A useful insight: bench dips are easier but put more stress on your shoulders compared to parallel bar dips. Only use them if you have healthy shoulders and good form.
Safety Tips And Injury Prevention
Dips are safe if done correctly, but poor technique or too much weight leads to injuries. Here’s how to avoid problems:
- Warm up well: Always prepare your joints and muscles before dips.
- Don’t go too deep: Stop when your upper arms are parallel to the floor.
- Keep shoulders down: Don’t let your shoulders rise toward your ears.
- Avoid flaring elbows: Keep elbows at about a 45-degree angle, not straight out to the sides.
- Progress slowly: Increase reps, sets, or weight gradually.
- Listen to pain: Sharp or pinching pain means stop. Mild muscle burn is normal; joint pain is not.
- Use proper equipment: Don’t use bars that are loose, too thin, or too slippery.
A non-obvious tip: fatigue changes your form. As you get tired, you may start to drop too low, swing your legs, or shrug your shoulders. Stop your set when your form breaks down, even if you haven’t hit your target rep number.
Common Dip Station Mistakes (and How To Fix Them)
Many people make the same errors when using a dip station. Here’s how to spot and fix them:
- Shrugging shoulders: If your shoulders rise toward your ears, you risk injury. Think about pulling your shoulder blades down and back.
- Flaring elbows: Elbows should not point straight out. Keep them at 45 degrees to your body.
- Half reps: Lowering only a few inches doesn’t work the muscles fully. Go to at least parallel.
- Swinging legs: Keep your body still. Swinging means your core is not tight.
- Neck craning: Looking up or down strains your neck. Keep your head in line with your spine.
- Uneven reps: If one side feels weaker, try using a mirror or recording yourself.
- Ignoring pain: Stop if you feel joint pain. Adjust your form or range of motion.
A quick self-check: set up your phone to record a side view of your dips. Watch your depth, elbow angle, and body position. Small corrections make a big difference over time.
Designing An Effective Dip Station Workout
You can use a dip station for a stand-alone workout or as part of a full upper body routine. Here’s a sample plan for different levels:
Beginner Dip Workout
- Assisted dips or bench dips: 3 sets of 8–10 reps
- Rest 90 seconds between sets
- Add push-ups and planks for more core and chest work
Intermediate Dip Workout
- Standard dips: 3–4 sets of 8–12 reps
- Negative dips: 2 sets of 5 reps (slow lower)
- Superset with bodyweight rows or pull-ups
Advanced Dip Workout
- Weighted dips: 4 sets of 6–8 reps
- Ring dips: 3 sets of 6 reps
- Plyometric dips: 2 sets of 5 reps (explosive up)
You can train dips 2–3 times per week. Allow at least one rest day between dip workouts. Track your progress and aim to add reps or weight slowly.
Here’s an example of a weekly schedule:
| Day | Dip Focus | Other Exercises |
|---|---|---|
| Monday | Standard dips | Push-ups, planks |
| Wednesday | Negative dips | Rows, biceps curls |
| Friday | Weighted dips | Pull-ups, overhead press |
A helpful insight: log every workout. Write down sets, reps, and how you felt. This helps you spot patterns and avoid plateaus.
How To Progress And Track Results
Progress is about more than just doing more dips. Here’s how to keep improving:
- Increase reps: Add one rep each week until you reach 12–15 per set.
- Add weight: Use a dip belt or backpack with books for resistance.
- Try harder variations: Move to ring dips or explosive dips as you get stronger.
- Improve form: Focus on slower, controlled reps and perfect posture.
- Shorten rest: Decrease rest between sets for endurance.
Measure your progress by:
- Recording your maximum reps in one set every month.
- Taking photos of your upper body to see muscle changes.
- Timing how long you can hold the top position (isometric hold).
A key tip: quality beats quantity. Ten perfect dips are better than twenty sloppy ones.
Integrating Dip Station Workouts With Other Exercises
Dips work best as part of a balanced routine. Combine dips with other pushing and pulling exercises for total upper body strength.
- Push-ups: Great for chest and triceps endurance.
- Pull-ups or chin-ups: Balance pushing with pulling.
- Rows: Build your back and protect your shoulders.
- Overhead press: Complete your shoulder training.
Example push-pull routine:
- Dips – 3 sets
- Pull-ups – 3 sets
- Push-ups – 2 sets
- Rows – 2 sets
Rest 60–90 seconds between sets. This routine works your chest, back, arms, and shoulders evenly.
A pro tip: Always start with the hardest exercise (like dips) when you are fresh. Your form will be best, and you can push harder.

Dip Station For Fat Loss And Conditioning
While dips build muscle, they can also help with fat loss if done as part of high-intensity workouts. Try circuit training:
- 8 dips
- 12 push-ups
- 15 squats
- 30 seconds jumping jacks
Repeat 3–5 times with minimal rest. This burns calories and builds endurance.
If you want to lose fat, combine dips with a healthy diet and other full-body exercises. Dips alone won’t burn much fat, but they keep your muscles strong while you lose weight.
Cleaning And Maintaining Your Dip Station
A dip station lasts longer and is safer if you care for it properly:
- Wipe grips after use: Sweat can make bars slippery and damage foam.
- Check bolts and screws: Tighten them monthly to prevent wobbling.
- Inspect for rust: Especially on home stations kept outside or in garages.
- Clean with mild soap: Avoid harsh chemicals that degrade rubber or paint.
- Store indoors: If possible, keep your station dry and away from direct sunlight.
If you use a gym dip station, report any damage to staff immediately. Don’t use equipment that feels loose or unstable.

When To Avoid Dip Station Exercises
While dips are excellent, some people should be cautious or avoid them:
- Shoulder injuries: Dips stress the front of the shoulder joint.
- Elbow or wrist pain: These joints bear your full body weight.
- Very overweight beginners: Start with assisted dips or bench dips to reduce risk.
- Poor shoulder mobility: If you can’t move your arms back comfortably, improve mobility first.
If you have pain or previous injuries, consult a physical therapist or trainer before starting dips. Sometimes, other exercises may be safer until you build strength and flexibility.
For more information on shoulder health and exercise safety, check resources like ACE Fitness.
Frequently Asked Questions
What Muscles Do Dips Work The Most?
Dips mainly target the triceps, chest, and front shoulders. They also work your core and back muscles for stability. Leaning forward works the chest more, while a straight body focuses on the triceps.
How Many Dips Should A Beginner Do?
Start with 2–3 sets of 4–6 reps. If you can’t do a full dip, use assisted dips or negatives. Focus on perfect form, not on high reps.
Are Dips Better Than Push-ups?
Both are excellent. Dips use more weight (your full body) and build muscle faster in the triceps and chest. Push-ups are easier for beginners and safer for the shoulders. Use both for best results.
Can I Do Dips Every Day?
No, your muscles need 1–2 days to recover between dip workouts. Doing dips daily can lead to overuse injuries and poor progress.
What If I Feel Pain During Dips?
Stop immediately if you feel sharp pain in your shoulders, elbows, or wrists. Check your form, reduce the range of motion, or use an easier variation. If pain continues, consult a trainer or health professional.
Using a dip station correctly is one of the most effective ways to build a strong upper body. Start with the right equipment, warm up, master your form, and progress gradually. Respect your limits, avoid common mistakes, and dips will reward you with real strength, muscle, and confidence.
