If you want to build strong, impressive arms and chest with just your body weight, dip exercises are a powerful tool. Dips look simple, but mastering and progressing in them is not always easy. Many people get stuck doing the same number of reps, feel pain in their shoulders, or never reach advanced versions. The truth is: progressing in dip exercises needs smart technique, structured training, and attention to details most beginners miss.
Let’s break down how you can go from basic dips to advanced variations, avoid common mistakes, and keep making gains month after month. Whether you train at home, at the gym, or even outdoors, this guide will help you understand each step to progress safely and efficiently.
What Are Dip Exercises And Why Do They Matter?
Dip exercises are a type of bodyweight strength movement. You support your weight on parallel bars, lower your body by bending your elbows, then press back up. Dips mainly work your triceps, chest, and shoulders.
Many athletes and trainers consider dips one of the best upper body exercises for these reasons:
- Dips use many muscles at once (compound movement)
- They build functional strength (good for sports and daily life)
- You can do them almost anywhere
- They allow for many variations, from beginner to expert level
While push-ups are also great, dips put more load on your arms and chest. This makes them excellent for developing muscle mass and upper body power.
Assessing Your Starting Point
Before you start progressing in dips, it’s important to know your current level. This helps you avoid injury and set realistic goals.
Can You Do A Full Dip?
Some people cannot perform even one full dip with proper form. If you try to “muscle through” and use bad technique, you risk hurting your shoulders or wrists.
A full dip means:
- You lower your body until your upper arms are at least parallel to the ground
- You press back up without swinging or using momentum
- Your shoulders do not roll forward too much
If you can’t do this, start with easier versions (explained below).
How Many Dips Can You Do?
Test yourself honestly. Use this rough guide:
- 0 reps: Start with assisted or negative dips
- 1–5 reps: Focus on building base strength
- 6–12 reps: Ready to add volume and small progressions
- 13+ reps: Time to add extra resistance or advanced variations
Tip: Quality matters more than quantity. Five perfect dips are better than 10 sloppy ones.

Building A Foundation: Preparing For Dips
Many beginners skip preparation and jump straight into dips. This can cause pain or slow progress.
Strengthen Supporting Muscles
To avoid injury and improve dip performance, strengthen these areas:
- Shoulders: Do exercises like scapular push-ups and band pull-aparts
- Triceps: Practice bench dips or close-grip push-ups
- Chest: Include push-ups and chest flys
- Core: Planks and hollow holds help keep your body stable
Improve Shoulder Mobility
Stiff shoulders make dips uncomfortable and risky. Try shoulder dislocates with a band or stick, and gentle stretching of the front deltoids and chest.
Practice Good Form With Easier Movements
If you can’t do a full dip, use these progressions:
- Bench/Chair Dips: Feet on the floor, hands on a bench behind you. Easier than parallel bar dips.
- Negative Dips: Start at the top position, slowly lower as far as you can, then step back up.
- Assisted Dips: Use resistance bands or a dip machine for support.
These steps build strength and confidence for real dips.
Mastering Dip Technique
Proper technique is the key to safe, effective progress in dips.
Key Steps For Perfect Form
- Grip the bars firmly, wrists straight
- Keep your chest up and shoulders pulled back
- Lower yourself slowly, elbows bending to at least 90 degrees (upper arms parallel to floor)
- Avoid shrugging your shoulders or letting them roll forward
- Push up powerfully, but don’t lock your elbows at the top
Common Mistakes To Avoid
- Going too deep: Going below parallel can hurt your shoulders, especially if you lack mobility
- Flaring elbows too wide: Keep elbows at about 45 degrees from your body
- Rushing reps: Fast, uncontrolled dips use momentum and risk injury
- Letting hips swing: Keep your core tight and body stable
Insight: Many beginners believe going as deep as possible is always better. But unless you have strong, mobile shoulders, stop when your upper arms are parallel to the ground. This protects your joints and still gives great results.
Structuring Your Dip Training
Improvement in dip exercises depends on smart, progressive training. It’s not just about doing more reps; it’s about increasing load, volume, or difficulty step by step.
How Often Should You Train Dips?
Most people make best progress training dips 2 to 3 times per week. Give your muscles at least one full rest day between sessions. If you train dips too often, you risk overuse injuries and slow recovery.
How Many Sets And Reps?
Here’s a guideline based on your level:
| Level | Sets per Session | Reps per Set | Rest Between Sets |
|---|---|---|---|
| Beginner | 3–4 | 3–8 | 90–120 seconds |
| Intermediate | 4–5 | 8–15 | 90 seconds |
| Advanced | 5–6 | 10–20 | 60–90 seconds |
If you hit the top end of your rep range with good form, it’s time to make the exercise harder.
Progression Methods
There are several ways to progress in dip exercises. Pick one or two at a time:
- Add reps: Increase the number of repetitions per set
- Add sets: Do more sets per workout
- Add resistance: Use a dip belt or hold a dumbbell between your legs
- Slow the tempo: Lower yourself more slowly (3–5 seconds down)
- Pause at the bottom: Add a 1–2 second pause before pressing up
- Try harder variations: Move to ring dips, Korean dips, or deep chest dips
Insight: Many people focus only on adding reps. But increasing time under tension (slower tempo, pauses) can be just as effective for muscle growth.
Assisted Dips: Breaking The First Barrier
If you struggle with full bodyweight dips, don’t worry. Most people need weeks or months to build up.
Using Resistance Bands
Loop a resistance band around the dip bars and under your knees or feet. The band helps lift some of your weight, making the movement easier. Start with a thicker band, then move to thinner bands as you get stronger.
Dip Machines
Many gyms have assisted dip machines. You kneel or stand on a platform that counterbalances your weight. Gradually reduce the assistance as your strength improves.
Negative Dips
Negative reps mean focusing on the lowering (eccentric) part. Start at the top, lower yourself as slowly as possible, then climb back up with your feet. This builds strength quickly.
Practical tip: Even if you can only do negative dips at first, practice holding the top position (lockout) for 10–20 seconds. This boosts your confidence and grip strength.
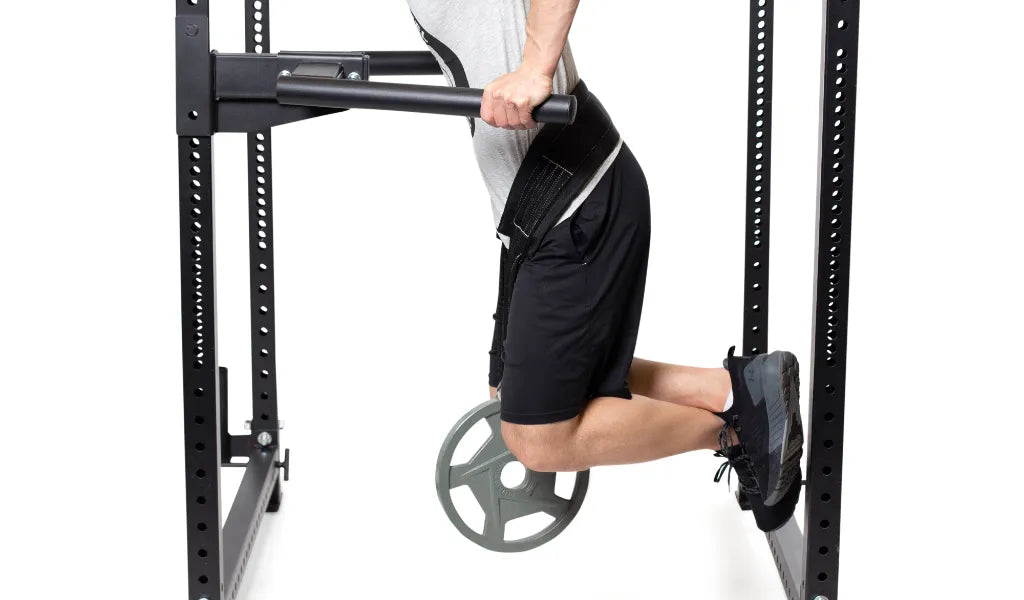
Adding Resistance: Weighted Dips
Once you can do 12–15 bodyweight dips with perfect form, it’s time to add resistance.
How To Add Weight
- Use a dip belt with weight plates attached
- Hold a dumbbell between your ankles or knees
- Wear a weighted vest
Start light—just 2. 5 or 5 kg extra. Focus on quality reps, not ego lifting.
Weighted Dip Progression Example
If you can do 3 sets of 12 dips with bodyweight:
- Add 5 kg and do 3 sets of 6–8 reps
- When you reach 3 sets of 10 with that weight, add another 2.5–5 kg
- Repeat
Safety reminder: Warm up your shoulders and triceps well before heavy dips. Never sacrifice form for weight.
Exploring Advanced Dip Variations
After mastering standard dips, you can challenge your muscles in new ways. Each variation targets your body differently.
| Variation | Main Focus | Skill Level |
|---|---|---|
| Ring Dips | Stability, full-body tension | Advanced |
| Korean Dips | Shoulders, chest stretch | Advanced |
| Straight Bar Dips | Triceps, chest | Intermediate |
| Deep Chest Dips | Chest, shoulders | Advanced |
| Plyometric Dips | Explosive strength | Advanced |
Ring Dips
Dips on gymnastic rings are much harder than bar dips. The rings move, forcing your muscles to stabilize every rep. Start slow—just holding the top position is a challenge.
Korean Dips
These dips use a straight bar behind your back. They stretch your shoulders and chest deeply. Only try Korean dips if you have great shoulder mobility and zero pain in standard dips.
Deep Chest Dips
Lean your torso forward more than in a standard dip. This shifts the emphasis to your chest. Be careful not to go too deep, especially if you have a history of shoulder problems.
Plyometric Dips
Push up explosively so your hands leave the bars for a split second. This builds power and speed. Only attempt if you are comfortable with regular and weighted dips.
Advanced insight: Switching variations not only keeps training fun, but also prevents overuse injuries. Each style trains supporting muscles in new ways.
Tracking Progress: How To Measure Your Improvement
If you want to keep improving in dips, tracking your progress is essential.
What To Track
- Number of reps and sets: Write down every session
- Added weight: Note how much extra resistance you use
- Tempo and pauses: Track changes in speed or hold times
- Form notes: If you struggle with depth or stability, write it down
Progress Stalls: What To Do
If your numbers stop improving for more than two weeks:
- Check your recovery (sleep, nutrition, rest days)
- Change your progression method (add weight instead of reps, or try harder variations)
- Focus on weak points (shoulder mobility, core strength)
Example: If you’re stuck at 10 dips for weeks, try adding a pause at the bottom or slowing the lowering phase. This new stimulus can “wake up” stalled muscles.
Injury Prevention And Recovery
Dips are demanding. Without care, they can stress your shoulders, wrists, and elbows.
Warm-up Essentials
Always warm up your shoulders and chest before dips. Use:
- Arm circles
- Shoulder rotations
- Light push-ups or band pull-aparts
Listen To Pain Signals
Sharp or deep pain is a warning sign. Stop dips immediately and rest. If discomfort continues, see a sports doctor or physical therapist.
Recovery Techniques
- Stretch your chest and shoulders after training
- Ice sore areas if needed
- Use massage or foam rolling for tight muscles
Important tip: Never ignore nagging shoulder pain. Early rest and rehab can prevent months of lost progress.
Nutrition And Rest For Dip Progress
Training alone is not enough for progress. Your muscles need fuel and time to rebuild.
Eat Enough Protein
For muscle growth, aim for about 1.6–2.2 grams of protein per kilogram of body weight daily. Good sources: chicken, fish, eggs, beans, dairy.
Prioritize Sleep
Muscles grow while you sleep. Adults need at least 7–9 hours per night for best recovery.
Avoid Overtraining
If you feel tired, weak, or lose motivation, take an extra rest day or reduce your dip volume for a week. Overtraining can set you back much more than missing one session.
Real-world Examples: Dip Progress In Action
Let’s look at two simple case studies that show dip progress is possible for anyone.
Case Study 1: From Zero To Ten Dips
Jin, age 29, could not do a single dip. He started with bench dips and negative dips 3 times a week. After one month, he could do 3 full dips. After three months, he reached 10 reps, then began adding weight.
Key lesson: Consistency and using easier progressions build strength faster than forcing full dips from day one.
Case Study 2: Breaking A Plateau With Weighted Dips
Fatima, age 34, was stuck at 12 dips for weeks. She added a 5 kg plate with a dip belt. At first, she managed only 5 reps per set. After 6 weeks, she could do 8 reps with the added weight, and her bodyweight dip max increased to 16.
Key lesson: Adding resistance can break plateaus and lead to new strength gains.
Common Dip Myths And Misunderstandings
Myth 1: Dips Are Bad For Your Shoulders
Fact: With good form and proper preparation, dips are safe for most people. Problems come from poor technique or lack of mobility.
Myth 2: Only Big Guys Can Do Dips
Fact: Anyone can build up to dips, regardless of size or gender, using progressions and patience.
Myth 3: More Reps Always Means More Progress
Fact: Quality, not just quantity, drives muscle growth. Slow, controlled dips with extra weight often work better than endless high-rep sets.
Myth 4: Dips Replace All Other Upper Body Moves
Fact: Dips are great, but you still need horizontal pushes (push-ups, bench press) and pulls (rows, pull-ups) for balanced development.
Frequently Asked Questions
How Many Dips Should I Do As A Beginner?
Start with 3–4 sets of as many good-form reps as you can (usually 3–8). Use assisted or negative dips if you can’t do a full dip yet.
Can I Do Dips Every Day?
No, most people need at least 1–2 rest days between dip sessions. Muscles need time to recover and grow. Overdoing dips can cause injuries.
Are Dips Better Than Push-ups For Chest And Triceps?
Dips put more weight on your chest and triceps, making them harder and often more effective for muscle growth. But push-ups are still excellent for endurance and variety.
What If Dips Hurt My Shoulders?
Stop immediately if you feel pain. Work on shoulder mobility, use easier progressions, and check your form. If pain continues, consult a health professional.
How Do I Know When To Add Weight To Dips?
When you can do 12–15 bodyweight dips with perfect form for several sets, start adding small amounts of weight (2. 5–5 kg) and build up slowly.
Progressing in dip exercises is not about luck or talent. With the right plan, patience, and attention to detail, anyone can build impressive strength and muscle through dips. Remember, focus on good form, use progressions wisely, and always listen to your body. As you master dips, you’ll unlock new levels of confidence and capability in your training. If you want to learn more about the science of bodyweight exercises, check out this calisthenics overview on Wikipedia. Stay consistent and enjoy the journey—your future self will thank you.